Content from Getting Started with GitHub Copilot
Last updated on 2025-12-15 | Edit this page
Estimated time: 30 minutes
Overview
Questions
- How do I register for a GitHub account?
- How can I get free GitHub Copilot access as a student?
- How do I set up GitHub Copilot in RStudio?
Objectives
- Create a GitHub account
- Apply for GitHub Student Developer Pack
- Install and configure GitHub Copilot in RStudio
- Verify GitHub Copilot is working as an autocompletion tool
Introduction
GitHub Copilot is an AI-powered code completion tool that can significantly enhance your coding experience in RStudio. This chapter will guide you through the process of setting up GitHub Copilot, from creating a GitHub account to configuring it in RStudio.
Registering with GitHub
If you don’t already have a GitHub account, follow these steps:
- Navigate to github.com
- Click the “Sign up” button in the top right corner
- Enter your email address (preferably your university/institutional email)
- Create a strong password
- Choose a username
- Verify your account through the email confirmation
Requesting GitHub Student Developer Pack
As of November 2025, GitHub offers free access to GitHub Copilot and other premium features to students through the GitHub Student Developer Pack.
Steps to Apply
- Go to education.github.com/pack
- Click on “Sign up for Student Developer Pack”
- Sign in with your GitHub account if not already logged in
- Fill out the application form:
- Select your school from the dropdown (or enter it manually)
- Provide your school-issued email address
- Describe how you plan to use GitHub (e.g., “For coursework and research projects”)
- Upload proof of enrollment:
- Student ID card
- Official enrollment letter
- Transcript or other academic document
- Submit your application
Application Processing Time
GitHub typically processes student applications within a few days, but it can take up to 2 weeks. You’ll receive an email notification once your application is approved.
Installing GitHub Copilot in RStudio
Once your GitHub Student Developer Pack is approved, you can set up GitHub Copilot in RStudio.
Installation Steps
-
Install the GitHub Copilot extension in RStudio:
- Open RStudio
- Go to
Tools→Global Options - Select
Copilotfrom the left sidebar - Click “Enable GitHub Copilot”
- If the Copilot option is not available, make sure you’re running RStudio 2022.02 or later
-
Sign in to GitHub:
- Click “Sign in to GitHub” in the Copilot settings
- A browser window will open asking you to authorize RStudio
- Click “Authorize” to grant RStudio access to your GitHub account
- You may be asked to enter a device code - copy the code shown in RStudio and paste it into the browser
-
Verify the connection:
- Return to RStudio
- You should see a confirmation that GitHub Copilot is enabled
- The status should show “GitHub Copilot: Active”
Challenge 1: Test GitHub Copilot
Open a new R script in RStudio and try typing a comment describing a function, such as:
R
# Function to calculate the mean of a numeric vector
Does GitHub Copilot suggest a function implementation?
GitHub Copilot should suggest a function implementation below your comment. The suggestion might look something like:
R
# Function to calculate the mean of a numeric vector
calculate_mean <- function(x) {
  sum(x) / length(x)
}
You can accept the suggestion by pressing Tab or
continue typing to see alternative suggestions.
Tips for Using Copilot
- Write clear, descriptive comments to get better suggestions
- Review all suggestions before accepting them
- Use Tab to accept a suggestion, or Esc to dismiss it
- Copilot learns from context, so well-structured code gets better suggestions
Configuring Copilot Settings
You can customize how GitHub Copilot works in RStudio:
- Go to
Tools→Global Options→Copilot - Adjust settings such as:
- Enable/Disable Copilot: Toggle Copilot on or off
- Suggestion mode: Configure how suggestions appear
- Keybindings: Customize keyboard shortcuts for accepting suggestions
Recommendation
For this course, we recommend to
disable “Index project files with GitHub Copilot”
- to speed up performance
- to reduce traffic
- to keep private code private
- to reduce unwanted suggestions from your existing codebase.
Troubleshooting Common Issues
Github Education Programm Registration fails
Check the security settings of your browser!
- Github (and thus the browser) want to check your location to verify your student status
- This check is sometimes blocked by strict privacy settings
- Try a different browser or adjust (temporarily) your privacy settings
Copilot is not showing suggestions
- Verify that Copilot is enabled in settings
- Check that you’re signed in to GitHub
- Check your internet connection
- Ensure your GitHub Copilot subscription is active
- Try restarting RStudio
Authorization fails
- Clear your browser cache and try again
- Make sure you’re using the correct GitHub account
- Check that your GitHub Copilot access is active
It’s all not working !!!
- Give us a ring! We are happy to help you to get started.
- A GitHub account is required to use GitHub Copilot
- Students can get free GitHub Copilot access through the GitHub Student Developer Pack
- GitHub Copilot integrates directly into RStudio as an autocompletion tool
- Test Copilot by writing descriptive comments and observing the suggestions
- Copilot can be customized through RStudio’s settings
Content from Where Do We Need AI Support?
Last updated on 2026-01-09 | Edit this page
Estimated time: 25 minutes
Overview
Questions
- What types of coding tasks can benefit from AI assistance?
- When should we use AI coding assistants and when shouldn’t we?
- What are the limitations of AI-powered coding tools?
Objectives
- Identify scenarios where AI coding assistants are most helpful
- Understand the limitations and potential pitfalls of AI-generated code
- Develop a balanced approach to using AI in coding workflows
- Recognize when human expertise is essential
Introduction
AI-powered coding assistants like GitHub Copilot have revolutionized how we write code, but understanding when and how to use them effectively is crucial. This chapter explores the scenarios where AI support is most beneficial and where caution is needed.
Scenarios Where AI Assistants Excel
1. Boilerplate Code Generation
AI assistants are particularly effective at generating repetitive, standard code patterns:
- Function templates and class structures
- Data validation checks
- Common data transformations
- Standard file I/O operations
Challenge 1: Identify Boilerplate Code
Think about your recent coding projects. List 2-3 examples of repetitive code patterns you frequently write that could benefit from AI assistance.
Examples might include:
- Reading CSV files and performing basic data cleaning
- Creating standard plotting functions with ggplot2
- Writing function documentation in roxygen2 format
- Setting up standard data frame transformations with dplyr
2. Code Completion and Syntax
AI can help with:
- Completing function arguments
- Suggesting appropriate function names from loaded packages
- Correcting syntax errors
- Providing context-aware variable names
Scenarios Requiring Caution
1. Complex Logic and Algorithms
AI assistants may struggle with:
- Domain-specific algorithms
- Complex statistical methods
- Unique business logic
- Performance-critical code
Critical Review Required
Always carefully review AI-generated code for:
- Logical correctness
- Edge case handling
- Performance implications
- Security vulnerabilities
2. Project-Specific Requirements
AI may not understand:
- Specific coding standards in your project
- Custom architectural patterns
- Project-specific constraints
- Team conventions and best practices
3. Data Privacy and Security
Be cautious when:
- Working with sensitive or proprietary data
- Implementing security-critical features
- Handling authentication and authorization
- Processing personal information
Data Privacy Considerations
Remember that code sent to AI services may be used for training.
Never include:
- API keys or passwords
- Proprietary algorithms/code
- Sensitive data
- Personal information
Limitations of AI Coding Assistants
Understanding Context
- AI may miss broader project context
- Limited understanding of project history and evolution
- Cannot always infer implicit requirements
Code Quality
- Generated code may not follow best practices
- Potential for introducing subtle bugs
- May suggest outdated or deprecated approaches
Dependency on Training Data
- Biased toward common patterns seen in training data
- May not know about very recent updates or libraries
- Could suggest obsolete methods
Challenge 2: Evaluate AI Suggestions
Consider this scenario: You ask an AI assistant to generate code for a statistical analysis. What questions should you ask yourself before accepting the suggestion?
Before accepting AI-generated code, ask:
- Does this code produce valid results?
- Are the assumptions appropriate for my data?
- Does it handle missing data correctly?
- Are there edge cases that aren’t covered?
- Is this the most efficient approach?
- Does it align with best practices in my field?
Keep asking/investigating until you can confidently answer “yes” to all questions!
Developing a Balanced Approach
Best Practices for Using AI Assistants
-
Start with a clear goal: Know what you want to
achieve before asking for AI help
- Best decompose complex tasks into smaller, manageable parts that can be easily checked
-
Review and understand: Never accept suggestions
blindly
- Request explanations for AI-generated code until you understand it fully
-
Test thoroughly: Validate all AI-generated code
- Think about “What can go wrong?” (edge cases) and design tests accordingly
-
Iterate and refine: Use AI suggestions as a
starting point, not the final solution
- Often AI helps with code fragments. Do/request a final revision to merge them into a coherent whole
-
Maintain ownership: You are responsible for the
code in your project
- Ensure it meets your project’s standards and requirements
Ways How AI Assistance Can Help You
Typically, one distinguishes between three ways of AI usage:
| Assistively | Directively | Autonomously |
|---|---|---|
 |
 |
 |
| AI suggests code snippets, completes lines, or generates boilerplate code automatically. | AI generates larger code blocks or entire functions based on explicit prompts. | AI independently creates code with minimal human input based on high-level requirements. |
| This is typically done automatically without the need to explicitly ask for it. | Here, you explicitly ask the AI to perform a specific task. | You provide high-level requirements or a description of a larger task, and the AI generates the code accordingly. |
Within this course, we will investigate all three ways of AI usage.
What is Supported by AI?
Beside the way how AI is used, one can also distinguish what process is supported by AI:
-
Coding Support
- AI assists with writing and revising your code
- i.e. AI is used as a tool within your coding workflow
- this can be done as a code assistant or as a code generator
- subtasks are e.g.
- syntax support: AI helps with code syntax, such as completing function calls, correcting errors, or suggesting variable names.
- logic support: AI assists with the logical structure of the code, such as suggesting algorithms, data structures, or control flow.
- documentation support: AI helps with writing comments, documentation, or explanations for the code.
- debugging support: AI assists in identifying and fixing bugs, suggesting test cases, or improving code quality.
- optimization support: AI helps improve code performance, suggesting optimizations, refactoring, or resource management techniques.
-
Data Processing Support: AI assists in cleaning,
transforming, and preparing data for analysis.
- i.e. AI is used as a tool within data processing pipelines.
- e.g. we will use the
ellmerR package later in this course for AI-supported data generation.
-
Project Management Support
- AI aids in organizing tasks, tracking progress, and managing timelines.
- i.e. AI is used as a tool within project management software
- e.g. GitHub Copilot Codespaces, GitHub Issues AI, etc.
-
Collaboration Support
- AI facilitates teamwork by suggesting code reviews, merging changes, or managing version control.
- e.g. GitHub Copilot Chat, GitHub Pull Requests AI, etc.
-
Learning Support
- AI provides educational assistance, such as explaining concepts,
suggesting resources, or guiding through coding challenges.
- typically using a chatbot interface
- e.g. ChatGPT, GitHub Copilot Chat, etc.
- AI provides educational assistance, such as explaining concepts,
suggesting resources, or guiding through coding challenges.
- … something missing?! Let us know!
Preparation of Group Discussion
In small groups, we want to discuss:
- Have you used AI coding assistants before? What was your experience?
- Can you share an example where AI helped you solve a problem?
- Can you share an example where AI suggestions were incorrect or unhelpful?
- How do you decide when to use AI assistance versus figuring things out yourself?
Thus, please think on these questions for our upcoming group discussion.
The Future of AI in Coding
AI assistants are rapidly evolving. As they improve, we should:
- Stay informed about new capabilities and limitations
- Continuously refine our approach to using these tools
- Share knowledge about effective practices
- Contribute to discussions about responsible AI use
- AI assistants excel at generating boilerplate code, completing syntax, and helping with documentation
- Use caution with complex logic, project-specific requirements, and security-critical code
- Always review and test AI-generated code thoroughly
- AI assistants are tools to augment, not replace, human expertise
- Develop a balanced approach that leverages AI strengths while maintaining code quality and security
- Stay open to learning and adapting as AI technologies evolve
Content from Risks, Drawbacks and Responsibilities with AI Usage
Last updated on 2026-01-19 | Edit this page
Estimated time: 45 minutes
Overview
Questions
- What can go wrong when using AI coding assistants?
- What are my responsibilities as a developer when using AI?
- When is AI usage inappropriate or a no-go?
- What are the side effects of heavy AI reliance?
- Why do LLMs produce incorrect code and how can I avoid it?
Objectives
- Understand potential risks and pitfalls of AI-assisted coding
- Recognize your responsibilities as a developer using AI tools
- Identify scenarios where AI usage is inappropriate
- Learn strategies to mitigate risks and verify AI-generated code
- Develop awareness of long-term effects of AI dependence
- Apply best practices for responsible AI usage in coding
Introduction
While AI coding assistants like GitHub Copilot can significantly enhance productivity, they come with important risks, drawbacks, and responsibilities. Understanding these challenges is crucial for using AI tools effectively and ethically. This lesson explores what can go wrong, your responsibilities as a user, and how to navigate the complex landscape of AI-assisted development.
The Double-Edged Sword
AI coding assistants are powerful tools that can accelerate development, but they require careful use. Just as you wouldn’t use a power tool without understanding safety precautions, you shouldn’t use AI coding assistants without understanding their limitations and risks.
What Can Go Wrong?
1. Incorrect or Buggy Code
AI models can generate code that appears correct but contains subtle bugs:
Example:
R
# AI might suggest
remove_last <- function(data) {
  data[1:length(data) - 1]  # Bug: access of data[0] will cause an error
}

# Correct version
remove_last <- function(data) {
  data[1:(length(data) - 1)]  # Proper parentheses to ensure correct indexing
}
Why this happens:
- AI learns from patterns in training data, including buggy code
- AI doesn’t execute or test the code it generates
- Subtle logic errors are harder for pattern-matching to detect
2. Security Vulnerabilities
AI may suggest code with security flaws:
R
# INSECURE: AI might suggest
execute_query <- function(user_input) {
  query <- paste0("SELECT * FROM users WHERE name = '", user_input, "'")
  dbGetQuery(conn, query)  # SQL injection vulnerability!
}

# SECURE: Use parameterized queries
execute_query <- function(user_input) {
  query <- "SELECT * FROM users WHERE name = ?"
  dbGetQuery(conn, query, params = list(user_input))
}
Security risks include:
- SQL injection vulnerabilities (misuse/manipulation of the database request)
- Cross-site scripting (XSS) in web applications
- Hardcoded credentials or API keys
- Unsafe file operations
- Improper input validation
3. Inefficient or Non-Performant Code
AI may suggest code that works but performs poorly:
R
# INEFFICIENT: AI might suggest
calculate_means <- function(data) {
  results <- list()
  for(i in 1:ncol(data)) {
    results[[i]] <- mean(data[, i])
  }
  return(unlist(results))
}

# EFFICIENT: Vectorized approach
calculate_means <- function(data) {
  colMeans(data)
}
4. License and Copyright Issues
AI models are trained on public code repositories, which may include:
- Code with restrictive licenses (e.g. GPL)
- Proprietary code that shouldn’t have been public
- Code with unclear licensing
Risks:
- Inadvertently incorporating GPL code into proprietary projects
- Note: GPL requires derivative works to also be GPL
- Copyright infringement claims
- License compliance violations
Your Responsibilities as an AI User
When using AI coding assistants, it is your responsibility to ensure code quality, security, and legality. It is important to remember that AI is a tool to assist you, not a substitute for your expertise and judgment. Thus, you have to regard AI suggestions with the same scrutiny as code from any other source.
With AI usage, your role changes from sole author to supervisor and validator of AI-generated code!
1. Code Ownership and Accountability
You are ultimately responsible for all code in your project, regardless of whether it was written by you or suggested by AI.
This means:
- You must understand every line of code you commit
- You are accountable for bugs, security issues, and performance problems
- You cannot blame the AI if something goes wrong
- You must be able to explain and defend your code choices
2. Verification and Testing
Especially when it comes to the generation of complex functions or algorithms, never blindly accept AI suggestions. Always verify through testing. This should be standard practice anyway, but is especially critical with AI-generated code.
R
# Example verification workflow
ai_suggested_function <- function(data) {
  # [AI-generated code here]
}

# REQUIRED: Create comprehensive tests
test_that("ai_suggested_function works correctly", {
  # Test normal cases
  expect_equal(ai_suggested_function(c(1, 2, 3)), expected_result)

  # Test edge cases
  expect_error(ai_suggested_function(NULL))
  expect_equal(ai_suggested_function(c()), expected_empty_result)
  expect_equal(ai_suggested_function(c(NA, 1, 2)), expected_with_na)

  # Test performance for large inputs
  large_data <- rep(1:1000, 1000)
  expect_lt(system.time(ai_suggested_function(large_data))[3], 1.0)
})
Note, creating test code is another area where AI can assist you very efficiently, but you must still verify the tests themselves and check if they cover all relevant cases.
3. Security Awareness
You must:
- Review all AI-generated code for security vulnerabilities
- Never include sensitive data in prompts to AI tools
- Understand that code sent to cloud-based AI may be logged or used for subsequent training and answering
- Follow security best practices even when AI suggests otherwise
Data Privacy Alert
When using cloud-based AI assistants:
- Your code snippets are in most cases sent to external servers
- Avoid including passwords, API keys, or sensitive data
- Check your organization’s policies on AI tool usage
- Consider using local AI models for sensitive projects
When AI Usage Is a No-Go
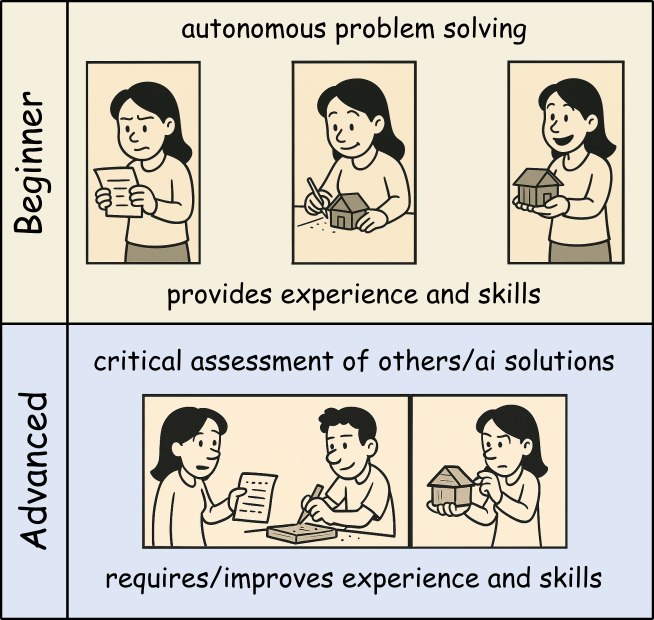
The easiness of using AI coding assistants can tempt developers to use them inappropriately. Especially if you are new to programming or a specific domain, it can be hard to judge when AI usage is acceptable and when not.
Thus, beginners should use AI tools as a personal learning assistant to get hints and explanations, but avoid using them to generate complete solutions for critical tasks you cannot yet judge properly yourself. That way, you can build up your own expertise boosted by AI help without becoming overly dependent on it.
Once you mastered the basics and can read and understand code well, you can start using AI more freely to broaden your productivity and understanding. Still, always be cautious when using AI for critical tasks beyond your expertise.
1. Specialized or Novel Algorithms
Be cautious with:
- Cutting-edge research implementations
- Domain-specific algorithms not well-represented online
- Novel statistical methods
- Proprietary business logic
Why: AI training data may not include correct implementations of specialized techniques.
2. Learning Fundamentals
Don’t use AI when:
- When not familiar with a new programming language
- You have no time or interest in understanding basic concepts and getting further explanations
- Completing academic assignments (unless explicitly allowed)
- Building foundational skills
Why: You need to develop core competencies yourself.
Side Effects of Heavy AI Reliance
1. Skill Atrophy
Long-term risks:
- Reduced ability to write code from scratch
- Weakened problem-solving skills
- Decreased understanding of fundamentals
- Dependency on AI availability
Example:
A developer who always uses AI for basic tasks may struggle when:
- Working offline
- Debugging complex issues
- Interviewing for new positions
- Mentoring junior developers
2. Reduced Code Understanding
Consequences:
- Difficulty maintaining code you didn’t write or understand
- Inability to debug when issues arise
- Challenges explaining code to colleagues
- Problems adapting code to changing requirements
3. Homogenization of Code
Problems:
- Repetition of common mistakes or old patterns/approaches
- Loss of creative problem-solving approaches
- “Cargo cult” programming (copying without understanding)
4. False Confidence
Dangers:
- Overestimating code quality because it “looks professional”
- Underestimating testing needs
- Reduced code review rigor
- Faster development at the cost of quality
Maintaining Skills While Using AI
Balance is key:
- Set aside time for coding without AI assistance
- Practice fundamental skills regularly
- Review and understand all AI-generated code
- Explain solutions to others to test your understanding
Why LLMs Produce Wrong Code
1. Pattern Matching, Not Understanding
LLMs don’t “understand” code:
- They predict likely token sequences based on training data
- They don’t execute code mentally to verify correctness
- They don’t reason about edge cases
- They replicate patterns even when inappropriate
Example:
R
# AI might suggest this pattern because it's common
calculate_average <- function(x) {
  sum(x) / length(x)  # Fails with NAs!
}

# But context might require
calculate_average <- function(x) {
  mean(x, na.rm = TRUE)  # Handles NAs correctly
}
2. Training Data Limitations
Issues with training data:
- Contains buggy code from public repositories
- May be outdated (not current best practices)
- Overrepresents certain languages and frameworks
- May include deprecated or insecure patterns
3. Context Window Limitations
LLMs have limited context:
- Can’t see entire project structure
- Miss important constraints from other files
- Don’t know your specific requirements
- Lack domain-specific knowledge
4. No Execution or Testing
Critical limitation:
- AI generates code but doesn’t run it
- No feedback loop from actual execution
- Can’t verify correctness through testing
- Doesn’t catch runtime errors
Challenge: Prompt Engineering for Better Code
Try improving AI-generated code quality by refining your prompts. Compare results:
Poor prompt:
Write a function to process data
Better prompt:
Write an R function that filters a data frame to include only rows where the ‘value’ column is positive and non-NA. Include input validation, error handling, and roxygen2 documentation.
Try both prompts with your AI assistant. How do the results differ?
Poor prompt typically produces:
- Generic, vague code
- No error handling
- No documentation
- Assumes undocumented column names
- Doesn’t handle edge cases
Better prompt typically produces:
- More specific, targeted code
- Input validation
- Documentation
- Explicit handling of requirements
- Better edge case coverage
Key lessons:
- Specific prompts → better results
- State requirements explicitly
- Request error handling and documentation
- Mention edge cases you care about
- Specify coding standards or style
But remember: Even with great prompts, always verify the output!
How to Avoid AI-Generated Errors
1. Adopt a Verification Mindset
Question everything:
R
# When AI suggests code, ask yourself:
# - Do I understand what this does?
# - What are the assumptions?
# - What could go wrong?
# - Are there edge cases?
# - Is this efficient?
# - Is this secure?
2. Prompt Engineering
Improve AI suggestions by extended initial prompts:
- Describe the general requirements (what packages to use, coding style, version constraints, etc.)
- Give details about the data structures involved
- Describe the coding task in detail
- Define critical edge cases (or request handling of edge cases)
- Request documentation and comments for clarity and subsequent maintenance
In some AI systems, general requirements can be provided as system prompts or initial context to guide all subsequent suggestions.
Best Practices for Responsible AI Usage
1. The 80/20 Rule
Use AI for the 80% of straightforward, repetitive tasks. Reserve human expertise for the critical 20% involving:
- Complex algorithms
- Security-sensitive code
- Performance optimization
- Architectural decisions
- Domain-specific logic
2. Treat AI as a Junior Developer
Think of AI as a smart but inexperienced assistant:
- It needs clear instructions
- It requires supervision
- Its work must be reviewed
- It shouldn’t handle critical tasks alone
- It can help with routine work
3. Document AI Usage
R
# Consider adding comments for transparency
#' Calculate weighted average
#'
#' This function was initially drafted with AI assistance
#' and subsequently reviewed, tested, and validated.
#'
#' @param values Numeric vector of values
#' @param weights Numeric vector of weights
#' @return Weighted average
calculate_weighted_avg <- function(values, weights) {
  # Implementation here
}
4. Continuous Skill Development
Maintain your skills:
- Practice coding without AI regularly
- Study algorithms and data structures
- Read high-quality code from experts
- Contribute to code reviews
- Teach others what you learn
5. Stay Informed
AI capabilities and limitations change rapidly:
- Follow updates to tools you use
- Learn about new AI capabilities
- Understand evolving best practices
- Participate in communities discussing AI use
Group Discussion
Within the session we want to discuss some of the following questions:
What are your “tricks” to check for and deal with wrong answers of the AI?
How do you know/decide whether AI usage is allowed/ok and when not?
Are policies (of organizations, employers, …) a sufficient guide regarding AI use?
Honestly, do you think AI usage helps to increase your skills or is a tempting way to reduce your learning/understanding efforts? Or do you have examples for both? If so, what makes the difference?
So think about them and make some notes of your thoughts and ideas!
Legal and Ethical Considerations
Copyright and Licensing
Key concerns:
- AI-generated code may resemble copyrighted code
- Unclear legal status of AI-generated content
- License compatibility issues
- Potential copyright infringement
Best practices:
- Understand your organization’s AI usage policies
- Check licenses of suggested dependencies
- Document AI usage for legal compliance
- Consult legal counsel for commercial projects
Privacy and Data Protection
Considerations:
- Code sent to AI services may be stored
- Proprietary algorithms might be leaked
- Sensitive data in code could be exposed
- Compliance with GDPR, HIPAA, etc.
Mitigation:
- Use local AI models for sensitive code
- Anonymize data in examples sent to AI
- Review AI service terms of service
- Follow organizational data policies
Conclusion
AI coding assistants are powerful tools that can enhance productivity, but they come with significant responsibilities. Success requires:
- Awareness of what can go wrong
- Responsibility for all code you commit
- Judgment about when AI is appropriate
- Verification of all AI suggestions
- Balance between AI assistance and skill development
- Ethics in how you use and disclose AI usage
Remember
AI is a tool, not a replacement for human expertise, judgment, and responsibility. Use it wisely, verify everything, and never stop learning.

- AI can generate incorrect, insecure, or inefficient code - always verify
- You are fully responsible for all code you commit, regardless of AI involvement
- AI usage is inappropriate for critical systems, novel algorithms, and learning fundamentals
- Heavy AI reliance can lead to skill atrophy and reduced code understanding
- LLMs produce wrong code because they pattern-match rather than understand
- Comprehensive testing, code review, and iterative refinement are essential
- Balance AI productivity gains with maintaining your programming skills
- Consider legal, ethical, and privacy implications of AI tool usage
- Treat AI as a junior assistant requiring supervision, not an expert to trust blindly
- Responsible AI usage requires continuous learning and critical thinking
Content from RStudio Autocompletion with Copilot
Last updated on 2026-01-09 | Edit this page
Estimated time: 40 minutes
Overview
Questions
- How does GitHub Copilot work as an autocompletion tool in RStudio?
- What are the best practices for getting useful suggestions from Copilot?
- How can I accept, reject, or modify Copilot suggestions?
Objectives
- Understand how GitHub Copilot generates code suggestions
- Learn techniques for writing effective prompts
- Practice accepting, rejecting, and modifying suggestions
- Develop efficient workflows using Copilot in RStudio
Using an AI assistively
GitHub Copilot functions as an advanced autocompletion tool in RStudio, going beyond simple syntax completion to suggest entire lines or blocks of code. This chapter covers how to use Copilot effectively as an autocompletion assistant.
How Copilot Works
GitHub Copilot uses machine learning models trained on billions of lines of public code to:
- Analyze the context of your current code
- Understand comments and function names
- Predict what you’re trying to accomplish
- Generate relevant code suggestions
Context is Key
Copilot examines:
- Your current file’s code
- Comments you’ve written
- Variable and function names
- The structure of your code
- Files from your RStudio project (depending on your settings)
The more context you provide, the better the suggestions!
Writing Effective Comments for Better Suggestions
Comment-Driven Development
One of the most effective ways to use Copilot is to write descriptive comments first:
Good Example:
R
# Load data from CSV file 'dat.csv', remove rows with missing values, and convert date column to Date type
Less Effective:
R
# Load data from 'dat.csv'
Challenge 1: Practice Writing Effective Comments
Write a detailed comment describing what you want the code to do for the following scenario:
You need to create a function that takes a data frame of student grades, calculates the average grade for each student, and returns only students with an average above 70.
R
# Function to calculate average grades per student and filter for high performers
# Input: data frame with columns 'student_name' and 'grade'
# Output: data frame with columns 'student_name' and 'avg_grade' for students with avg > 70
Accepting and Managing Suggestions
Keyboard Shortcuts
- Tab: Accept the entire suggestion
- Esc: Dismiss the current suggestion
- Ctrl + Shift + L or Cmd + Shift + L: Request a new suggestion
Partial Acceptance
You can accept suggestions word-by-word:
- Ctrl + → or Cmd + →: Accept next word
- This allows you to use parts of a suggestion while continuing to type
Ghost Text
Copilot suggestions appear as gray “ghost text” in your editor. This makes it easy to see suggestions without disrupting your coding flow.
Techniques for Getting Better Suggestions
1. Provide Clear Function Signatures
Start with a clear function definition:
R
# Copilot works better when you define function structure first
calculate_summary_stats <- function(data, group_var) {
  # Calculate mean, median, and sd for each group

}
2. Use Meaningful Variable Names
R
# Better - descriptive names help Copilot understand context
student_grades_df <- read.csv("grades.csv")

# Less helpful
df <- read.csv("grades.csv")
3. Break Down Complex Tasks
Instead of asking for everything at once:
R
# Step 1: Load and clean data
# Load CSV file with student information

# Step 2: Calculate metrics
# Calculate average grade per student

# Step 3: Filter results
# Keep only students with average above threshold
Challenge 2: Experiment with Context
Try generating code for the same task with different levels of context:
- Just type:
read.csv( - Add a comment first:
# Load student data from grades.csvthenread.csv( - Add more context:
R
# Data has columns: student_id, name, grade, date
# Load student data from grades.csv with explicit column types
then read.csv(
You should notice that:
- With minimal context, Copilot might just complete the parentheses
- With a comment, it might suggest the filename
- With detailed context, it might suggest the filename AND additional
parameters like
stringsAsFactors = FALSEorheader = TRUE
Working with Different Types of Suggestions
Single-Line Completions
Best for:
- Completing function calls
- Finishing variable assignments
- Adding package imports
Example:
Multi-Line Suggestions
Best for:
- Function implementations
- Code blocks (if/else, loops)
- Multiple related operations
Example:
R
# Function to plot distribution with ggplot2
plot_distribution <- function(data, column) {
  # Copilot may suggest entire function body
}
Questions
It is also possible to ask Copilot questions in comments:
- write a comment starting with
# q:followed by your question
For instance
R
# q: What is meant with facetting in ggplot2?
produced
R
# A: Facetting in ggplot2 refers to the process of creating multiple subplots (facets) within a single plot, based on the values of one or more categorical variables.
# This allows for easy comparison of distributions or relationships across different subsets of the data.
Why is the suggestion incomplete?
Communication between RStudio and the AI service is done in chunks and the amount of ‘tokens’ (words/pieces of words) that can be sent at once is limited. The same holds true for the response from the AI service. If your code or comment is very long, or if the AI service generates a long suggestion, it may get cut off.
In that case, it is typically sufficient to accept what has been suggested so far and then request a new suggestion (just wait) to continue from there.
Best Practices for Efficient Workflow
1. Review Before Accepting
Always read the suggestion before pressing Tab key:
- Check for logical errors
- Verify it matches your intent
- Look for security issues
2. Iterate and Refine
- Accept a suggestion as a starting point
- Modify it to fit your specific needs
- Add error handling and edge cases
3. Combine with Traditional Coding
- Use Copilot for repetitive tasks
- Code critical logic yourself
- Let Copilot help with boilerplate
Maintain Your Coding Skills
While Copilot is helpful, continue to:
- Understand the code you’re using
- Practice writing code without assistance
- Learn from the suggestions Copilot provides
Common Patterns and Use Cases
In the following, we highlight some common coding patterns where
Copilot can be particularly useful. Therein, [...]
indicates your cursor position where Copilot will provide
suggestions.
Data Manipulation with dplyr
R
# Copilot excels at suggesting dplyr pipelines
# Filter data for specific conditions and group by category
data %>%
[...]
Copilot suggests the rest..
Note: triggering extensions via comments can also be used at the end or within a pipeline to add the next step or add an intermediate transformation.
Writing Functions
Copilot will suggest the function body, e.g. using regex patterns and validation logic
Challenge 3: Build a Function with Copilot
Use Copilot to help you create a function that:
- Takes a numeric vector as input
- Removes outliers (values > 3 standard deviations from mean)
- Returns the cleaned vector
Start with a descriptive comment and function signature.
R
# Function to remove outliers from a numeric vector
# Outliers are defined as values more than 3 SD from the mean
# Input: numeric vector
# Output: numeric vector with outliers removed
remove_outliers <- function(x, sd_threshold = 3) {
  # Let Copilot suggest the implementation
  # It might suggest something like:
  mean_x <- mean(x, na.rm = TRUE)
  sd_x <- sd(x, na.rm = TRUE)
  x[abs(x - mean_x) <= sd_threshold * sd_x]
}
Remember to test the function with sample data!
Troubleshooting Suggestions
Copilot Suggests Incorrect Code
- Provide more specific comments
- Add type hints or example data structures
- Break down the task into smaller steps
Advanced Tips
Setting Constraints
R
# Function must handle NA values and return informative error messages
- Copilot generates suggestions based on context from your code and comments
- Write clear, descriptive comments to get better suggestions
- Use Tab to accept, and Esc to dismiss suggestions
- Break complex tasks into smaller steps for more accurate suggestions
- Always review and test AI-generated code before using it
- Combine Copilot assistance with your own coding expertise for best results
Content from Context Definition and the AGENTS.md Concept
Last updated on 2026-01-02 | Edit this page
Estimated time: 35 minutes
Overview
Questions
- Why is context important for AI coding assistants?
- What is the
AGENTS.mdconcept? - How can I define coding standards for AI agents in my R project?
- What are other ways to provide context to AI assistants?
Objectives
- Understand the importance of context definitions for AI agents
- Learn about the
AGENTS.mdspecification - Create an
AGENTS.mdfile with R project-specific guidelines - Explore alternative methods for providing context to AI assistants
Introduction
As AI coding assistants become more integrated into our development workflows, it’s crucial to provide them with appropriate context about project-specific conventions, coding standards, and preferences. Without proper context, AI assistants may generate code that, while functionally correct, doesn’t align with your project’s style or best practices.
This chapter explores how to define context for AI agents, focusing
on the AGENTS.md concept and other strategies for
communicating your project’s coding standards to AI assistants.
Context is Key
Just as human developers need onboarding documentation to understand a project’s conventions, AI assistants benefit from explicit context definitions. Clear guidelines help AI tools generate code that fits seamlessly into your existing codebase.
The Need for General Context Definitions
Why Context Matters
When working with AI coding assistants, providing clear context helps ensure:
- Consistency: Code generated by AI matches your project’s existing style and patterns
- Best Practices: AI follows domain-specific conventions (e.g., using tidyverse packages in R)
- Efficiency: Less time spent revising AI-generated code to match your standards
- Maintainability: Generated code is easier for team members to understand and maintain
- Learning: AI can help reinforce good coding practices by consistently applying them
Types of Context
Context for AI assistants can include:
- Language-specific conventions: Which libraries or frameworks to prefer
- Style guidelines: Naming conventions, formatting, documentation standards
- Architectural patterns: How to structure code, which design patterns to use
- Project-specific rules: Custom conventions unique to your codebase
- Domain knowledge: Specialized terminology or domain-specific best practices
The AGENTS.md Concept
What is AGENTS.md?
AGENTS.md is a standardized approach to providing context and
guidelines for AI coding assistants directly within your repository. By
placing an AGENTS.md file in your repository root, you
create a machine-readable specification that AI tools can reference when
generating or reviewing code.
The concept is documented at https://agents.md/, which provides:
- Specifications for the
AGENTS.mdformat - Examples from various programming languages and domains
- Best practices for writing effective agent guidelines
- Community-contributed templates and patterns
How AGENTS.md Works
When an AI assistant (like GitHub Copilot, Cursor, or other AI tools)
works in a repository with an AGENTS.md file, it can:
- Read the guidelines at the start of a session
- Apply the rules when generating code suggestions
- Reference the standards when reviewing or revising code
- Adapt behavior to match project-specific preferences
Multiple AGENTS.md Files
You can place AGENTS.md files at different levels of
your project hierarchy. AI assistants typically use the
closest AGENTS.md file relative to the
current working file:
-
Repository root (
/AGENTS.md): Defines project-wide standards that apply to all code -
Subdirectory (
/src/AGENTS.md,/tests/AGENTS.md): Provides context-specific guidelines that override or extend root-level rules -
Module-level
(
/src/data-processing/AGENTS.md): Defines specialized rules for specific components
Example hierarchy:
my-r-project/
├── AGENTS.md               # General tidyverse standards
├── src/
│   └── analysis/
│       └── AGENTS.md       # Additional statistical analysis guidelines
└── tests/
    └── AGENTS.md           # Testing-specific conventions
When working on a file like /src/analysis/models.R, the
AI assistant will prioritize: 1. /src/analysis/AGENTS.md
(most specific) 2. /src/AGENTS.md (if it exists) 3.
/AGENTS.md (project-wide defaults)
This hierarchical approach allows you to maintain general standards while accommodating specialized needs in different parts of your codebase.
Version Control Benefits
Since AGENTS.md is a simple text file and can be easily
version-controlled alongside your code, e.g. using git,
it:
- Evolves with your project
- Can be reviewed and improved through pull requests
- Maintains consistency across different development stages
- Provides historical context for coding decisions
Example: AGENTS.md for an R Project
Here’s a comprehensive but quite extensive example of an
AGENTS.md file for an R project that emphasizes tidyverse
principles and functional programming patterns:
MARKDOWN
# AGENTS.md - R Project Coding Guidelines

## Overview

This R project follows tidyverse conventions and functional programming principles.
AI assistants should generate code that adheres to these guidelines.

## Language and Framework

- **Primary Language**: R (version 4.1 or higher)
- **Core Framework**: tidyverse
- **Required Packages**: dplyr, tidyr, ggplot2, purrr, readr

## Code Style Principles

### 1. Mandatory Tidyverse Usage

All data manipulation and analysis code MUST use tidyverse packages and functions.

**Prefer:**
```r
mtcars %>%
  filter(mpg > 20) %>%
  select(mpg, cyl, hp)
```

**Avoid:**
```r
mtcars[mtcars$mpg > 20, c("mpg", "cyl", "hp")]
```

### 2. Piping Over Local Variables

ALWAYS favor piping operations over creating intermediate local variables.

**Prefer:**
```r
mtcars %>%
  filter(cyl == 6) %>%
  mutate(efficiency = mpg / hp) %>%
  arrange(desc(efficiency)) %>%
  head(10)
```

**Avoid:**
```r
cars_filtered <- filter(mtcars, cyl == 6)
cars_mutated <- mutate(cars_filtered, efficiency = mpg / hp)
cars_sorted <- arrange(cars_mutated, desc(efficiency))
result <- head(cars_sorted, 10)
```

### 3. Prohibition of Variable Overwriting

NEVER overwrite existing variables. Use piping to transform data in a single flow.

**Forbidden:**
```r
data <- read_csv("input.csv")
data <- filter(data, value > 0)
data <- mutate(data, log_value = log(value))
data <- arrange(data, date)
```

**Required:**
```r
data <- read_csv("input.csv") %>%
  filter(value > 0) %>%
  mutate(log_value = log(value)) %>%
  arrange(date)
```

### 4. Sparse Use of Local Variables

Minimize the creation of intermediate variables. Only create local variables when:
- The result will be used multiple times in different contexts
- The variable name significantly improves code readability
- The computation is expensive and should not be repeated

**Acceptable local variable usage:**
```r
# Used in multiple independent operations
base_data <- read_csv("data.csv") %>%
  filter(status == "active")

summary_stats <- base_data %>%
  summarize(mean_value = mean(value), sd_value = sd(value))

detailed_analysis <- base_data %>%
  group_by(category) %>%
  summarize(across(where(is.numeric), list(mean = mean, sd = sd)))
```

### 5. Multiline Pipes with Documentation

Pipelines MUST be formatted across multiple lines with inline documentation.

**Required format:**
```r
analysis_results <- raw_data %>%
  # Remove incomplete cases and outliers
  filter(complete.cases(.), between(value, 0, 100)) %>%
  # Normalize values by group
  group_by(category) %>%
  mutate(normalized = (value - mean(value)) / sd(value)) %>%
  ungroup() %>%
  # Calculate derived metrics
  mutate(
    log_value = log1p(value),
    squared_value = value^2,
    interaction = value * normalized
  ) %>%
  # Sort by importance
  arrange(desc(abs(normalized)))
```

Each step in a pipeline should:
- Be on its own line
- Have a preceding comment explaining its purpose
- Use meaningful intermediate calculations when needed

### 6. Function Definitions

Functions should also follow piping principles when applicable:

```r
process_dataset <- function(data, threshold = 0.05) {
  data %>%
    # Filter based on significance threshold
    filter(p_value < threshold) %>%
    # Calculate effect sizes
    mutate(
      effect_size = (mean_treatment - mean_control) / pooled_sd,
      ci_lower = effect_size - 1.96 * se,
      ci_upper = effect_size + 1.96 * se
    ) %>%
    # Add interpretation
    mutate(
      significant = p_value < threshold,
      effect_magnitude = case_when(
        abs(effect_size) < 0.2 ~ "small",
        abs(effect_size) < 0.8 ~ "medium",
        TRUE ~ "large"
      )
    )
}
```

## Forbidden Patterns

1. **Loop-based operations** when vectorized or tidyverse alternatives exist
2. **Direct variable assignment in loops** - use `purrr::map()` family instead
3. **Base R subsetting syntax** - use `dplyr::filter()` and `dplyr::select()`
4. **Nested function calls** without pipes when multiple operations are chained
5. **`attach()` function** - always use explicit data references

## Documentation Standards

- Use roxygen2-style comments for all functions
- Include inline comments for complex pipeline steps
- Document assumptions and data requirements
- Explain any deviations from these guidelines (rare cases only)

## Examples of Complete Workflows

### Data Import and Cleaning
```r
cleaned_data <- read_csv("raw_data.csv") %>%
  # Handle missing values
  drop_na(key_columns) %>%
  # Standardize column names
  rename_with(tolower) %>%
  # Type conversion
  mutate(across(ends_with("_date"), ymd)) %>%
  # Remove duplicates
  distinct()
```

### Analysis Pipeline
```r
analysis <- cleaned_data %>%
  # Subset to relevant period
  filter(between(date, start_date, end_date)) %>%
  # Group-level transformations
  group_by(category, region) %>%
  summarize(
    n_obs = n(),
    mean_value = mean(value, na.rm = TRUE),
    median_value = median(value, na.rm = TRUE),
    .groups = "drop"
  ) %>%
  # Calculate derived metrics
  mutate(
    relative_value = mean_value / median_value,
    weight = n_obs / sum(n_obs)
  ) %>%
  # Final filtering
  filter(n_obs >= min_sample_size)
```

## Additional Guidelines

- Prefer `tibble` over `data.frame`
- Use `readr::read_*()` over base R `read.*()` functions
- Always specify `.groups` argument when using `summarize()` with `group_by()`
- Use `across()` for operations on multiple columns
- Leverage `case_when()` for complex conditional logic
Challenge 1: Create Your Own AGENTS.md
Create an AGENTS.md file for one of your own R projects.
Consider:
- What coding style do you prefer?
- Which packages should be favored?
- What patterns should be avoided?
- How should functions be documented?
Your AGENTS.md should include:
- Clear statement of purpose
- Specific package preferences with examples
- Do’s and don’ts with code comparisons
- Documentation requirements
- Examples of good practices
Remember: Start simple and expand based on your project’s needs.
Other Options to Specify Context
While AGENTS.md is a powerful tool, there are several complementary or alternative approaches to providing context to AI assistants:
1. Inline Comments and Documentation
AI assistants can learn from well-documented code:
R
# This project uses tidyverse conventions exclusively
library(tidyverse)

#' Process customer data following tidyverse patterns
#'
#' @param data A tibble with customer information
#' @return A processed tibble with standardized columns
#' @examples
#' process_customers(raw_customers)
process_customers <- function(data) {
  # Always use piping for multi-step transformations
  data %>%
    filter(!is.na(customer_id)) %>%
    mutate(name = str_to_title(name))
}
2. Chat Instructions
When using AI chat interfaces, provide context explicitly:
I'm working on an R project that follows strict tidyverse conventions.
Please generate all code using:

- dplyr for data manipulation
- Piping (%>%) for all multi-step operations
- No variable overwriting
- Comments before each pipe step5. Style Guides with Tools
Use automated style checking tools like lintr to enforce
standards:
R
# .lintr configuration
linters: linters_with_defaults(
  line_length_linter(120),
  object_usage_linter = NULL,
  # Enforce tidyverse style
  assignment_linter(),
  pipe_continuation_linter()
)
6. Pre-commit Hooks
Enforce standards before code is committed via pre-commit hooks
7. Copilot Instructions in IDE
Some IDEs allow workspace-specific instructions for AI assistants. While specific settings vary by tool and may evolve, the concept involves configuring your IDE to provide additional context files or instructions to the AI assistant.
Note on IDE-Specific Settings
The availability and configuration of AI assistant settings varies across IDEs and tools. Check your specific IDE’s documentation for current options to provide context to AI coding assistants.
Combining Approaches
The most effective strategy often combines multiple approaches:
- AGENTS.md for comprehensive, machine-readable guidelines
- Inline comments for implementation-specific context
- Chat instructions for interactive sessions
- Automated tools for enforcement
Best Practices for Context Definitions
Keep It Focused
- Start with the most important rules
- Don’t try to specify everything at once
- Expand based on actual needs and pain points
Use Examples Liberally
- Show preferred patterns with code examples
- Demonstrate anti-patterns to avoid
- Include both simple and complex scenarios
Make It Discoverable
- Place context files in repository root
- Reference them in README and contributing guides
- Keep them up-to-date with project evolution
Test Your Guidelines
- Verify that AI actually follows your guidelines
- Iterate based on the quality of generated code
- Collect feedback from team members
Version Control Context
- Track changes to context definitions
- Review updates through pull requests
- Document why rules were added or changed
Challenge 2: Context Specification Strategy
For a team R project, design a context specification strategy that includes:
- What would go in
AGENTS.md? - What would be better as inline comments?
- How would you communicate standards to new team members?
- AGENTS.md: Core style principles, mandatory patterns, forbidden practices
- Inline comments: Function-specific logic, data flow explanations, edge cases
- README.md: Quick-start guide, links to detailed standards, setup instructions
- Onboarding docs: Human-readable explanation of why standards exist, examples
- Code reviews: Consistent feedback referring to documented standards
The key is redundancy across human and AI channels.
Summary
Providing proper context to AI coding assistants is essential for
generating high-quality, consistent code. The AGENTS.md
concept offers a standardized, version-controlled approach to defining
project-specific guidelines. Combined with other context specification
methods, it creates a comprehensive environment where AI assistants can
truly enhance your development workflow.
- Context definitions help AI assistants generate code that matches your project standards
- Context improves consistency: AI-generated code matches your project standards
-
AGENTS.mdprovides a standardized, version-controlled, machine-readable way to specify coding guidelines - Multiple
AGENTS.mdfiles can exist at different hierarchy levels; AI assistants use the closest file - Effective
AGENTS.mdfiles include clear examples of preferred and forbidden patterns - Start simple and iterate: Begin with core principles and expand based on needs
- Combining
AGENTS.mdwith inline comments, chat instructions, and tooling creates robust context - R projects benefit from explicit tidyverse usage and piping conventions in context definitions
Content from Using AI within Pipelines via ellmer
Last updated on 2026-02-09 | Edit this page
Estimated time: 50 minutes
Overview
Questions
- What is
ellmerand how does it integrate with AI models? - How can I set up
ellmerwith GitHub Copilot in RStudio? - How can I use AI prompts to process data within my analysis pipelines?
- What are the best practices for integrating AI into data processing workflows?
Objectives
- Understand the
ellmerpackage and its capabilities - Install and configure
ellmerfor use with AI models - Integrate AI prompts into data processing pipelines
- Apply AI-powered transformations to datasets
- Develop reproducible AI-enhanced workflows
Introduction
The ellmer package provides a powerful interface for
integrating large language models (LLMs) into R workflows. This enables
you to leverage AI capabilities directly within your data processing
pipelines, combining traditional statistical computing with modern AI
assistance.
What is ellmer?
ellmer is an R package that provides a unified interface
to various LLM providers, including:
- GitHub Copilot (via GitHub Models)
- OpenAI models
- Anthropic Claude
- Google Gemini
- Local models via Ollama
It allows you to:
- Send prompts to AI models from R code
- Process text data with AI assistance
- Generate structured outputs
- Stream responses for interactive applications
Why Use ellmer?
- Unified API: Work with different AI providers using consistent syntax
- Pipeline Integration: Seamlessly incorporate AI into tidyverse workflows
- Reproducible: Track prompts and model versions for reproducible research
- Flexible: Switch between models without rewriting code
Installing ellmer
First, install the ellmer package from CRAN or
GitHub:
R
# Install from CRAN
install.packages("ellmer")

# Or install development version from GitHub
# install.packages("remotes")
remotes::install_github("tidyverse/ellmer")
Load the package:
R
library(ellmer)
library(tidyverse)  # For data manipulation
Setting Up ellmer with GitHub Copilot
To use ellmer with GitHub Copilot (via GitHub Models),
you need to set up authentication.
Step 1-pat: Getting Access to GitHub Models
Given that we have already registered our GitHub account in
RStudio, to use the GitHub Copilot features, we can proceed
to use the GitHub Models via ellmer without further
actions.
Step 1-explicit: Get a GitHub Token and Store It Securely
The following steps are only needed, if you have not already set up GitHub authentication in RStudio.
- Go to github.com/settings/tokens
- Click “Generate new token” → “Generate new token (classic)”
- Give it a descriptive name (e.g., “ellmer-access”)
- Select the required scopes (typically
repoanduser) - Click “Generate token” and copy it immediately
Store your token securely in your R environment:
R
# Option 1: Set for the current session
Sys.setenv(GITHUB_TOKEN = "your-token-here")

# Option 2: Store permanently in .Renviron
usethis::edit_r_environ()
# Add this line: GITHUB_TOKEN=your-token-here
# Save and restart R
Security Best Practice
Never commit tokens or API keys to your code! Always use environment
variables and add .Renviron to your .gitignore
file.
Step 2: Initialize a Chat Object
R
# Create a chat session with GitHub Copilot
chat <- chat_github()  # the used default model will be printed

# Test the connection
chat$chat("Hi, please give me a joke!")
Challenge 1: Setup and Test
ellmer
- Install the
ellmerpackage - Create a chat object and send a test message
- Verify you receive a response and enjoy your joke..
- What do you see, when you print your
chatobject?
Printing the chat object shows
- the model being used
- the number of tokens sent and received
- the total cost incurred (if applicable)
- the history of messages exchanged
Using AI for Data Processing
Basic Text Processing
Process individual text strings with AI:
R
# Classify sentiment
texts <- c(
  "I love this product!",
  "This is terrible.",
  "It's okay, not great."
)

# Use AI to classify sentiment
chat <- chat_github()
# iterative call of chat interface using sapply() or purrr::map()
results <- purrr::map_chr(texts,
  function(text) {
    chat$chat(paste("Classify the sentiment (positive/negative/neutral):", text))
  })
Processing Data in Pipelines
Integrate AI into tidyverse pipelines:
R
# Example: Customer feedback analysis
feedback_data <- tibble(
  id = 1:5,
  comment = c(
    "Great service, very helpful!",
    "Long wait times, not happy.",
    "Average experience.",
    "Excellent quality and fast delivery!",
    "Product arrived damaged."
  )
)

# Add AI-powered sentiment analysis
feedback_processed <- feedback_data %>%
  rowwise() %>% # ensures each row/information is processed individually
  mutate(
    sentiment = chat$chat(
      paste("Classify as positive/negative/neutral:", comment)
    ),
    key_themes = chat$chat(
      paste("Extract main themes (max 3 words):", comment)
    )
  )
Aggregated calls to reduce IO and number of prompts
So far, one chat() call (prompt) was made per row.
An alternative is to aggregate multiple inputs into a single prompt, reducing the number of API calls:
R
feedback_data |>
  mutate(
    mood =
      comment |>
      str_c(collapse="#") |>
      chat$chat( "Assign to each product feedback answer (provided as #-separated list) a respective category from (happy,unhappy) in a #-separated aggregated text output",
                      echo = "none") |>
      str_split_1("#")
  )
That way, only one API call is made for the entire dataset.
But when working on larger datasets, be aware of token limits per prompt (both input and output tokens).
Rate Limits and Costs
Be aware of:
- API rate limits for your chosen provider (limited number of requests per minute/hour)
- Limited token quotas and prompt sizes
- Potential costs for API calls
- Processing time for large datasets
- Consider batching requests when possible (less tokens spent)
Advanced: Structured Output Generation
Request structured data from AI models:
R
# Extract structured information
extract_info <- function(text) {
  prompt <- paste0(
    "Extract the following from this text and return as JSON:\n",
    "- sentiment (positive/negative/neutral)\n",
    "- urgency (high/medium/low)\n",
    "- category (product/service/delivery/other)\n\n",
    "Text: ", text
  )

  chat$chat(prompt)
}

# Apply to dataset
feedback_structured <- feedback_data %>%
  rowwise() %>%
  mutate(analysis = extract_info(comment))
Challenge 2: Build a Data Processing Pipeline
Create a tidyverse pipeline that:
- creates a
tibbledataset (columnsreview_idandtext) with the following product reviews
- The software is intuitive but lacks some features. Rating: 4/5
- Terrible experience, crashed multiple times. Very disappointed.
- Perfect for my needs! Easy to use and fast. Highly recommend.
- Uses AI to classify the main topic of each review in up to two words
- Extracts a numerical satisfaction score (1-5) from the text
R
library(ellmer)
library(tidyverse)

# Sample data
reviews <- tibble(
  review_id = 1:3,
  text = c(
    "The software is intuitive but lacks some features. Rating: 4/5",
    "Terrible experience, crashed multiple times. Very disappointed.",
    "Perfect for my needs! Easy to use and fast. Highly recommend."
  )
)

# Initialize chat
chat <- chat_github()

# Process with AI
reviews %>%
  rowwise() %>%
  mutate(
    topic = chat$chat(paste("Main topic (1-2 words):", text)),
    score = chat$chat(paste("Satisfaction score 1-5:", text)),
  ) %>%
  ungroup()
Local LLMs
So far, we have focused on cloud-based AI models like GitHub Copilot. Thus, our setup required internet access and API tokens. Since the latter may incur costs and have rate limits, local models can be a viable alternative for some use cases. This is especially true for high-volume applications or sensitive data. Furthermore, this reduces dependency on external services and the costs associated with them.
To use local models with ellmer, you can leverage Ollama, which allows you to run LLMs on
your local machine.
The general steps are:
- Install Ollama and set up a local model that fits both your computational resources and needs
- Install the
ellmerpackage - Initialize a chat object for the local model
A detailed guide for setting up Ollama with ellmer can
be found in the
Best Practices for AI in Pipelines
1. Design Clear Prompts
R
# Good: Specific and constrained
prompt <- "Classify sentiment as: positive, negative, or neutral.
          Return only one word."

# Less effective: Vague
prompt <- "What do you think about this?"
2. Handle Errors Gracefully
R
safe_chat <- function(chat, prompt) {
  tryCatch(
    chat$chat(prompt),
    error = function(e) {
      warning("API call failed: ", e$message)
      return(NA)
    }
  )
}

# Use in pipeline
data %>%
  mutate(ai_result = safe_chat(chat, prompt))
This is especially important when working with large datasets or unreliable network connections.
3. Cache Results
Write your AI-generated data to file to avoid redundant calls:
R
# Save processed results to avoid reprocessing
processed_data <- data %>%
  mutate(ai_field = process_with_ai(text))

# Save to disk
write_rds(processed_data, "cache/processed_data.rds")

# Load cached version later
processed_data <- read_rds("cache/processed_data.rds")
This reduces redundant API calls and speeds up data processing.
You might even want to write your script in a way, that it first checks, whether a cached version exists, and only processes the data if not. That way, you can easily re-run your whole analysis without incurring additional costs or delays.
4. Use Batch Processing for Large Datasets
R
# Process in chunks to manage rate limits
process_in_batches <- function(data, batch_size = 10) {
  data %>%
    mutate(batch = ceiling(row_number() / batch_size)) %>%
    group_by(batch) %>%
    mutate(ai_result = process_with_ai(text)) %>%
    ungroup() %>%
    select(-batch)
}
This approach is especially useful for large datasets to avoid hitting API rate limits.
Furthermore, it can be nicely combined with the “aggregated calls” approach shown earlier.
Reproducibility Considerations
Document your AI pipeline for reproducibility:
R
# Initialize chat
chat <- chat_github()

# Record model and version
metadata <- list(
  model = chat$get_model(),
  provider = "github",
  date = Sys.Date(),
  ellmer_version = packageVersion("ellmer"),
  prompt_template = "Classify sentiment: {text}"
)

# Save with results
list(
  data = processed_data,
  metadata = metadata
) %>%
  write_rds("results_with_metadata.rds")
Group Discussion
Consider the following questions for discussion within the class:
- What types of data processing tasks in your work could benefit from AI integration?
- How would you balance reproducibility with using AI models that may change over time?
- What ethical considerations arise when using AI to process data?
- How do you validate the quality of AI-generated classifications or summaries?
Real-World Use Cases
Text Classification
R
# Categorize research abstracts
abstracts %>%
  mutate(field = chat$chat(
    paste("Research field (one word):", abstract)
  ))
Data Cleaning
R
# Standardize inconsistent entries
messy_data %>%
  mutate(cleaned = chat$chat(
    paste("Standardize company name:", company_name_raw)
  ))
Content Generation
R
# Generate descriptions
products %>%
  mutate(description = chat$chat(
    paste("Write 20-word product description for:", product_name)
  ))
Translation and Localization
R
# Translate content
content %>%
  mutate(translated = chat$chat(
    paste("Translate to Spanish:", english_text)
  ))
Challenge 3: Implement a Complete Workflow
Choose a scenario and implement a complete AI-enhanced pipeline:
- Option A: Analyze a dataset of tweets/social media posts
- Option B: Process customer support tickets
- Option C: Categorize research papers by topic
Include error handling, caching, and metadata tracking.
R
library(ellmer)
library(tidyverse)

# Initialize
chat <- chat_github()

# Process tickets
process_ticket <- function(ticket_text) {
  list(
    category = safe_chat(chat,
      paste("Category (billing/technical/account):", ticket_text)),
    priority = safe_chat(chat,
      paste("Priority (high/medium/low):", ticket_text)),
    suggested_response = safe_chat(chat,
      paste("Suggest 2-sentence response:", ticket_text))
  )
}

# Apply to dataset
tickets_processed <- tickets %>%
  rowwise() %>%
  mutate(analysis = list(process_ticket(description))) %>%
  unnest_wider(analysis)

# Save with metadata
output <- list(
  data = tickets_processed,
  metadata = list(
    processed = Sys.time(),
    model = chat$get_model(),
    n_tickets = nrow(tickets)
  )
)

write_rds(output, "processed_tickets.rds")
Troubleshooting Common Issues
Authentication Errors
- Verify your token is set correctly:
-
Sys.getenv("GITHUB_PAT_GITHUB_COM")for RStudio setup -
Sys.getenv("GITHUB_TOKEN")for explicit token setup from above
-
- Ensure token has required permissions
- Check token hasn’t expired
Rate Limiting
- Implement delays between requests:
Sys.sleep(1) - Use batch processing
- Consider caching results
- Monitor API usage
- Consider installation of local models via Ollama for heavy workloads
Inconsistent Results
- Make prompts more specific
- Add constraints to expected outputs
- Use temperature parameter (if supported)
- Validate and clean AI outputs
Future Developments
Stay updated with ellmer developments:
- New model integrations
- Enhanced streaming capabilities
- Better error handling
- Performance improvements
Check the ellmer documentation regularly for updates.
-
ellmerprovides a unified interface for integrating LLMs into R workflows - Set up authentication using environment variables for security
- Integrate AI prompts seamlessly into tidyverse pipelines
- Design clear, constrained prompts for consistent results
- Implement error handling and caching for robust pipelines
- Document models and prompts for reproducibility
- Consider rate limits, costs, and ethical implications when using AI in data processing
- Local model options are available for high-volume use cases
Content from Understanding and Setting LLM Parameters
Last updated on 2026-01-19 | Edit this page
Estimated time: 40 minutes
Overview
Questions
- How do large language models generate responses?
- What parameters control LLM behavior?
- How can I adjust LLM parameters to improve result quality?
- How do I set parameters when using
ellmer?
Objectives
- Understand how LLMs generate text through token probability
- Learn the difference between deterministic and random outputs
- Configure temperature, top_k, top_p, and seed parameters
- Apply parameter settings in
ellmerfor better results - Follow best practices for AI-driven data processing
Introduction
When working with large language models (LLMs) like GitHub Copilot, understanding how these models generate responses and how to control their behavior is essential for getting consistent, high-quality results. This episode explores the inner workings of LLMs and the parameters you can adjust to guide their output.
How LLMs Generate Responses
Large language models generate text through a process called autoregressive token generation. Let’s break down what this means:
Token-by-Token Generation
- Input Processing: The model receives your prompt and converts it into tokens (words or word pieces)
- Probability Calculation: For each position, the model calculates probability scores for all possible next tokens
- Token Selection: A token is selected based on these probabilities
- Iteration: The selected token is added to the sequence, and the process repeats
This means that each word (or token) in the response is chosen based on:
- The original prompt
- All previously generated tokens
- A probability distribution over the vocabulary
Deterministic vs. Random Generation
The way a model selects tokens has a significant impact on the quality and consistency of results.
Deterministic Generation
- Always selects the highest probability token
- Produces consistent, reproducible results
- Useful for tasks requiring reliability (e.g., code generation, data extraction)
- Can be repetitive or lack creativity
Random (Stochastic) Generation
- Samples from the probability distribution
- Produces varied, creative results
- Useful for content generation, brainstorming
- Results may be inconsistent across runs
- Can occasionally produce unexpected or incorrect outputs
The parameters we’ll discuss control this balance between deterministic and random behavior.
Key LLM Parameters
Temperature
Temperature controls the randomness of token selection by adjusting the probability distribution.
-
Low temperature (e.g., 0.0-0.5):
- Sharpens the distribution (high-probability tokens become even more likely)
- More deterministic and focused outputs
- Better for factual tasks, code generation, data processing
-
High temperature (e.g., 0.8-1.5):
- Flattens the distribution (gives lower-probability tokens more chance)
- More creative and diverse outputs
- Better for creative writing, brainstorming
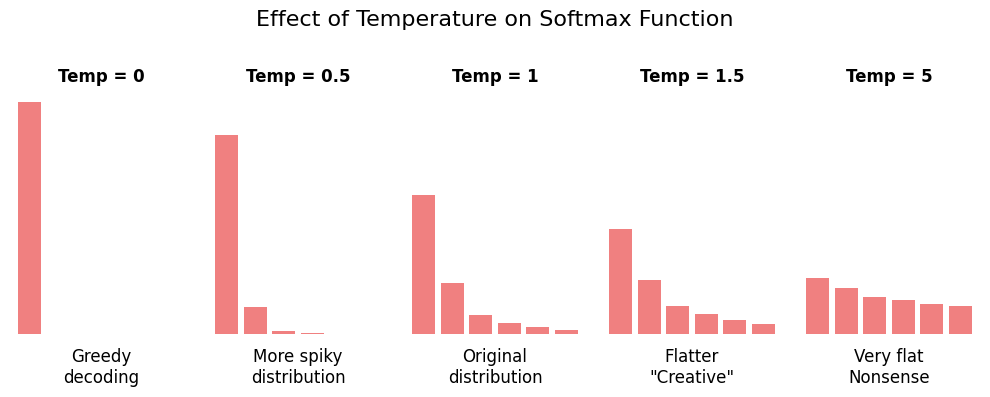
Top-K Sampling
Top-K limits the selection to the K most probable tokens.
- Only the top K tokens with highest probability are considered
- All other tokens are given zero probability
- Reduces the chance of selecting very unlikely tokens
- Helps prevent nonsensical outputs
For example, with top_k = 50:
- Only the 50 most likely tokens can be selected
- The other thousands of tokens are excluded
- The model samples randomly among these 50 tokens (influenced by temperature)
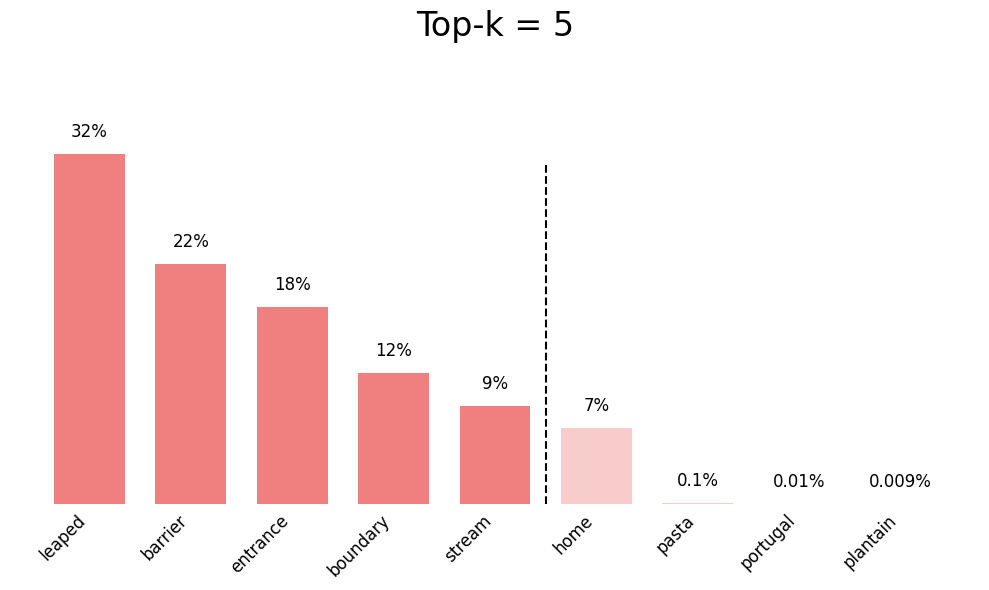
Top-P Sampling (Nucleus Sampling)
Top-P (also called nucleus sampling) selects from the smallest set of tokens whose cumulative probability exceeds P.
- Dynamically adjusts the number of tokens considered
- More adaptive than top-K
- With
top_p = 0.9, tokens are selected until their cumulative probability reaches 90%
The advantage of top-P over top-K:
- When the model is confident (one token has high probability), fewer tokens are considered
- When the model is uncertain (probabilities are spread out), more tokens are considered
- This adapts better to different contexts
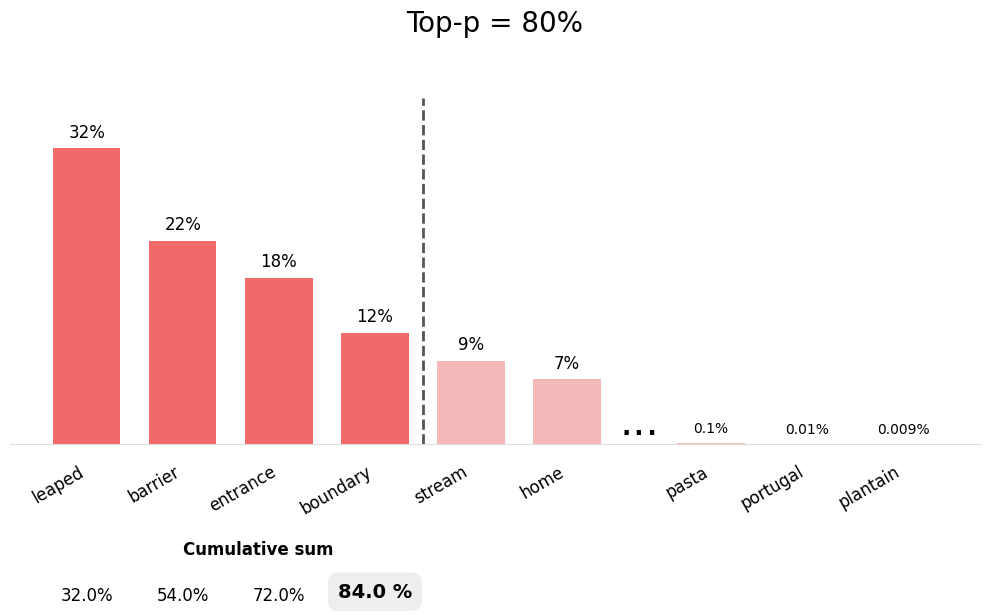
Seed
Seed controls the random number generator for reproducible results.
- Setting the same seed with the same prompt produces identical outputs
- Useful for debugging and testing
- Enables reproducible research
- Note: Different model versions may still produce different results even with the same seed. Furthermore, model internal effects due to parallelization etc. might also cause minor differences.
Setting Parameters in ellmer
The ellmer package provides the params()
function to configure LLM parameters. Here’s how to use it:
Parameter Settings for Different Tasks
Viewing Current Parameters
You can check the parameters being used by a chat object:
R
# Create chat with parameters
chat <- chat_github(params = params(temperature = 0.3))

# The chat object will show the configured parameters when printed
print(chat)
Parameter Availability
Not all LLM providers support all parameters. GitHub Copilot models typically support:
temperaturetop_p-
seed(may vary by model)
Parameter support may vary depending on your ellmer version and the specific model provider. Check the ellmer documentation for the most up-to-date information on parameter support for your version.
Challenge 1: Experiment with Temperature
Create two chat sessions with different temperature settings and compare their outputs for repeated calls:
- For the following prompt: “Name with one word an animal that fits
the following description ‘It has sharp teeth and a long tail’”
- do the prompt individually for temperature 0.1 and 2.0
- repeat the model creation and prompting 3 times each
- Compare the creativity and variety of responses
Which temperature setting would you use for your research and in which context?
R
library(ellmer)

for ( i in 1:3) {
  # Low temperature - deterministic
  llm <- chat_github(params = params(temperature = 0.1))
  llm$chat("Name with one word an animal that fits the following description 'It has sharp teeth and a long tail'")
  # High temperature - creative
  llm <- chat_github(params = params(temperature = 2.0))
  llm$chat("Name with one word an animal that fits the following description 'It has sharp teeth and a long tail'")
}
Discussion:
- The low temperature setting will likely produce more conventional, safe suggestions and repetition (reproducability) is higher
- The high temperature setting may produce more creative but potentially less practical names
- For research, you might want to stick with deterministic model setups in order to keep your results reproducible and sound
Best Practices for AI-Driven Data Processing with ellmer
When using LLMs for data processing tasks, follow these guidelines to ensure reliable and reproducible results:
1. Use Low Temperature for Consistency
R
# For data classification, extraction, or transformation
chat <- chat_github(
  params = params(
    temperature = 0.2,  # Consistent outputs
    seed = 123          # Reproducibility
  )
)

# Process data
data %>%
  rowwise() %>%
  mutate(category = chat$chat(paste("Classify:", text)))
2. Set Seeds for Reproducible Research
R
# Document your parameters in your analysis script
ANALYSIS_PARAMS <- params(
  temperature = 0.3,
  top_p = 0.85,
  seed = 42  # Document this in your README
)

chat <- chat_github(params = ANALYSIS_PARAMS)
3. Test Parameter Settings on Sample Data
R
# Test on a small sample first
sample_data <- data %>% slice_sample(n = 10)

# Try different parameter settings
params_conservative <- params(temperature = 0.1, seed = 1)
params_balanced <- params(temperature = 0.5, seed = 1)

# Compare results before processing full dataset
4. Document Parameter Choices
R
# Save metadata with your processed data
processing_metadata <- list(
  date = Sys.Date(),
  model = chat$get_model(),
  parameters = list(
    temperature = 0.3,
    top_p = 0.9,
    seed = 123
  ),
  ellmer_version = as.character(packageVersion("ellmer"))
)

# Save with your results
output <- list(
  data = processed_data,
  metadata = processing_metadata
)
write_rds(output, "processed_data_with_metadata.rds")
Reflection: Parameter Trade-offs
Consider these questions:
- When might you want to prioritize creativity over consistency?
- How do parameter settings affect the interpretability of AI-processed data?
- What are the implications of using low vs. high temperature for scientific reproducibility?
- How should parameter choices be documented in published research?
Parameter Selection Guidelines
Here’s a quick reference for choosing parameter values:
| Task Type | Temperature | Top-P | Seed | Reasoning |
|---|---|---|---|---|
| Code generation | 0.1-0.3 | 0.8-0.9 | Yes | Need deterministic, correct syntax |
| Data classification | 0.1-0.2 | 0.8 | Yes | Consistency is critical |
| Text extraction | 0.2-0.4 | 0.85 | Yes | Balance accuracy and flexibility |
| Content summarization | 0.3-0.5 | 0.9 | Optional | Some creativity helps |
| Creative writing | 0.7-1.0 | 0.95 | No | Maximize diversity |
| Brainstorming | 0.8-1.2 | 0.95 | No | Want unexpected ideas |
- LLMs generate text through repeated token probability calculations and random selection
- Temperature controls the randomness of outputs: low values are more deterministic, high values are more creative
- Top-K and top-P sampling limit token selection to reduce nonsensical outputs
- Seeds enable reproducible results when using the same prompt and parameters
- Use
params()in ellmer to configure temperature, top_p, seed, and other parameters - For data processing, use low temperature (0.1-0.3) and set seed for reproducibility
- Document parameter choices and model versions for transparent, reproducible research
- Test parameter settings on sample data before processing full datasets
- Combine appropriate parameters with clear prompts for best results
Content from Revise Your Code with AI
Last updated on 2026-02-13 | Edit this page
Estimated time: 40 minutes
Overview
Questions
- How can I use AI to check and improve my code?
- What are effective strategies for code review with AI assistants?
- How do I use chat interfaces for iterative code refinement?
- When should I trust AI suggestions for code revisions?
Objectives
- Use AI chat interfaces to review and analyze code
- Identify code issues with AI assistance
- Iteratively refine code based on AI feedback
- Validate AI suggestions critically
- Develop a workflow for AI-assisted code revision
Using AI directively
AI-powered tools can serve as an additional pair of eyes when reviewing and improving your code. This chapter explores how to effectively use AI chat interfaces to check, revise, and validate your R code, ensuring better quality and maintainability.
Why Use AI for Code Review?
AI assistants can help identify:
- Logic errors: Potential bugs or incorrect implementations
- Performance issues: Inefficient code patterns
- Style problems: Code that doesn’t follow best practices
- Documentation gaps: Missing or unclear comments
- Security vulnerabilities: Potential security risks
AI as a Complement, Not Replacement
AI code review should complement, not replace:
- Your own understanding of the code
- Human peer reviews
- Automated testing and linting tools
- Domain expertise
Setting Up for AI Code Review
Using GitHub Copilot Chat in your browser
Currently (as of end 2025), RStudio has no built-in AI chat interface
However, you can use GitHub Copilot Chat within your browser.
To this end:
- Navigate to https://github.com/copilot
- For an extended list of models:
- Ensure you have a GitHub Copilot subscription
- Sign in
If you have any other AI chat interface you prefer (e.g., ChatGPT, Claude), you can use that as well.
When using a browser, you have to manually copy and paste code snippets between RStudio and the chat interface to get reviews and suggestions. While this is less seamless than an integrated solution, it still allows you to leverage AI for code review.
Alternative: Use the chattr app within RStudio
The chattr
package provides an interface to chat with AI models directly within
RStudio.
The chattr_app() function will open a Shiny app where
you can interact with various AI models. Alternatively, you can run the
app via the RStudio “Addins”” menu by selecting “Open chat”.
Unfortunately, running the chat interface will “block” your R session until you close the app.
A workaround is to run the app in “job” mode using
R
chattr::chattr_app(as_job = TRUE)
That way, you can continue working in your main R session while chatting with the AI in a separate window. The con is that the chattr app won’t be able to directly interact with your current document in RStudio.
Via the same “Addins” menu, you can also select code in your R script and choose “Send prompt” to get AI feedback on that specific code snippet, which will be copied back directly below your selection.
As of now, I personally find using GitHub Copilot Chat in the browser
more flexible for code review tasks, but the chattr package
is a promising option for integrated RStudio workflows.
If you are interested in a more sophisticated AI integration into your IDE, you might have to consider to try another IDE such as Positron or Visual Studio Code.
Basic Code Review Workflow
The following steps are a general workflow for using AI to review and improve your R code.
Step 1: Request an Initial Review
Select your code and ask AI to review it:
R
# Example code to review
calculate_mean <- function(numbers) {
  sum(numbers) / length(numbers)
}
Prompt for AI: > Review this function for potential issues and suggest improvements.
Challenge 1: Basic Code Review
Ask AI to review the following function. What issues does it identify?
R
process_data <- function(data) {
  result <- data[data$value > 0]
  mean_val <- sum(result$value) / nrow(result)
  return(mean_val)
}
- No NA handling: Function will fail if there are NA values
-
Division by zero: If no rows match the condition,
nrow(result)is 0 -
Column existence: Assumes
valuecolumn exists without checking -
No input validation: Doesn’t verify
datais a data frame
Improved version:
R
process_data <- function(data) {
  # Input validation
  if (!is.data.frame(data)) {
    stop("Input must be a data frame")
  }
  if (!"value" %in% names(data)) {
    stop("Data frame must contain 'value' column")
  }

  # Filter and calculate
  result <- data[data$value > 0 & !is.na(data$value), ]

  if (nrow(result) == 0) {
    warning("No positive values found")
    return(NA)
  }

  mean(result$value, na.rm = TRUE)
}
Step 2: Ask Specific Questions
Be specific about what you want to check:
Good prompts:
- “Does this function handle edge cases correctly?”
- “Are there any performance bottlenecks in this loop?”
- “Is this code following tidyverse style guidelines?”
- “Could this code be more readable?”
Less effective prompts:
- “Is this good?”
- “Check this code”
Iterative Refinement Process
Round 1: Initial Review
R
# Your initial code
analyze_sales <- function(sales_data) {
  total <- 0
  for(i in 1:nrow(sales_data)) {
    total <- total + sales_data[i, "amount"]
  }
  return(total / nrow(sales_data))
}
AI Feedback: “This uses a slow loop. Consider vectorization.”
Round 2: Apply Suggestions
R
analyze_sales <- function(sales_data) {
  mean(sales_data$amount)
}
AI Feedback: “Good! Consider adding NA handling and input validation.”
Round 3: Further Refinement
R
analyze_sales <- function(sales_data) {
  if (!is.data.frame(sales_data)) {
    stop("Input must be a data frame")
  }
  if (!"amount" %in% names(sales_data)) {
    stop("Data must contain 'amount' column")
  }

  mean(sales_data$amount, na.rm = TRUE)
}
Iterative Improvement
Don’t expect perfect code in one iteration. Use AI as a collaborative partner:
- Get initial feedback
- Make changes
- Ask for review again
- Repeat until satisfied
Common Code Issues AI Can Help Identify
1. Logic Errors
R
# Problematic code
if (x > 0 & y > 0) {  # What if x or y is NA?
  process(x, y)
}
AI can suggest:
R
if (!is.na(x) && !is.na(y) && x > 0 && y > 0) {
  process(x, y)
}
Did you notice the change from & to
&&? If you don’t know why, ask AI!
2. Performance Problems
R
# Slow: Growing vector in loop
result <- c()
for(i in 1:10000) {
  result <- c(result, calculate(i))
}
AI can suggest:
R
# Fast: Pre-allocate vector
result <- vector("numeric", 10000)
for(i in 1:10000) {
  result[i] <- calculate(i)
}

# Even better: Vectorize if possible using sapply() or purrr
result <- purrr::map_dbl(1:10000, calculate)
3. Code Readability
R
# Hard to read
f <- function(x, y, z) { x + y * z / (x - y) }
AI can suggest:
R
# More readable
calculate_metric <-
  function(base_value, multiplier, divisor) {
    adjustment <- multiplier * divisor
    denominator <- base_value - multiplier

    base_value + (adjustment / denominator)
  }
Challenge 2: Iterative Code Improvement
Start with this code and iteratively improve it with AI assistance:
R
my_function <- function(x) {
  y <- c()
  for(i in 1:length(x)) {
    if(x[i] > 0) {
      y <- c(y, x[i] * 2)
    }
  }
  return(y)
}
Ask AI to help you:
- Improve performance
- Add error handling
- Improve readability
- Add documentation
R
#' Double positive values in a numeric vector
#'
#' Takes a numeric vector and returns a new vector containing
#' only the positive values, each doubled.
#'
#' @param x A numeric vector
#' @return A numeric vector of doubled positive values
#' @examples
#' double_positives(c(-1, 2, -3, 4))  # Returns c(4, 8)
double_positives <- function(x) {
  # Input validation
  if (!is.numeric(x)) {
    stop("Input must be a numeric vector")
  }

  # Vectorized filtering and transformation
  positive_values <- x[x > 0 & !is.na(x)]
  positive_values * 2
}
Key improvements:
- Descriptive function name
- Roxygen documentation
- Input validation
- Vectorized operations (much faster)
-
NAhandling
Using Chat for Code Explanation
AI can help you understand unfamiliar code:
R
# Complex code you found
result <- df %>%
  group_by(category) %>%
  summarise(
    mean_val = mean(value, na.rm = TRUE),
    .groups = "drop"
  ) %>%
  filter(mean_val > quantile(mean_val, 0.75))
Prompt:
Explain what this code does step by step.
AI response would explain:
- Groups data by category
- Calculates mean value per category
- Drops grouping structure
- Filters for top 25% of means
Often it is a good idea to ask the AI to incorporate explanations as comments in the code itself. That way, you have both the code and the explanation together for future reference and rereading.
Double-Checking AI Suggestions
Always Validate AI Recommendations
R
# AI suggests: "Use this for better performance"
result <- parallel::mclapply(data, complex_function)
Questions to ask yourself:
- Does this actually work with my data?
- Is parallel processing appropriate here?
- Will this work on all platforms (Windows issues with mclapply)?
- Is the complexity worth the performance gain?
Test AI Suggestions
Never blindly accept AI code suggestions:
- Run the code with test data
- Verify results match expectations
- Check edge cases
- Benchmark performance claims
- Ensure compatibility with your environment
Creating Test Cases
Use AI to help generate tests:
Prompt:
Generate test cases for this function, including edge cases.
R
# Your function
safe_divide <- function(a, b) {
  if (b == 0) return(NA)
  a / b
}
AI-generated tests:
R
# Test cases
test_that("safe_divide works correctly", {
  expect_equal(safe_divide(10, 2), 5)
  expect_equal(safe_divide(0, 5), 0)
  expect_true(is.na(safe_divide(5, 0)))
  expect_true(is.na(safe_divide(Inf, 0)))
  expect_equal(safe_divide(-10, 2), -5)
})
While this will provide the needed code for tests, make sure to review the tested values and adapt the tests to your specific needs.
Advanced Code Review Techniques
1. Security Review
Prompt:
Review this code for security vulnerabilities.
R
# Potentially unsafe
query <- paste0("SELECT * FROM users WHERE id = ", user_input)
AI might warn: SQL injection risk!
2. Style Consistency
Prompt:
Does this code follow tidyverse style guidelines?
R
# Inconsistent style
myFunction<-function(x,y){return(x+y)}
AI suggests:
R
# Consistent style
my_function <- function(x, y) {
  x + y
}
3. Documentation Review
Prompt:
Is this function well-documented? Suggest improvements.
R
calc <- function(x, y) {
  x * y + mean(x)
}
AI suggests adding:
R
#' Calculate weighted metric
#'
#' Multiplies two vectors element-wise and adds the mean of the first vector
#'
#' @param x Numeric vector for values
#' @param y Numeric vector for weights
#' @return Numeric vector of weighted values plus mean adjustment
calc <- function(x, y) {
  x * y + mean(x)
}
Challenge 3: Comprehensive Code Review
Perform a complete AI-assisted review of this analysis function:
R
analyze <- function(d) {
  d2 <- d[d$val > 0]
  m <- sum(d2$val) / length(d2$val)
  s <- sqrt(sum((d2$val - m)^2) / length(d2$val))
  list(m, s)
}
Review for:
- Correctness
- Efficiency
- Readability
- Documentation
- Error handling
R
#' Calculate mean and standard deviation for positive values
#'
#' Filters a data frame to positive values in the specified column
#' and calculates descriptive statistics
#'
#' @param data A data frame containing the data to analyze
#' @param value_col Name of the column containing values (default: "val")
#' @return A named list with 'mean' and 'sd' of positive values
#' @examples
#' analyze_positive_values(data.frame(val = c(-1, 2, 3, 4)))
analyze_positive_values <- function(data, value_col = "val") {
  # Input validation
  if (!is.data.frame(data)) {
    stop("Input must be a data frame")
  }
  if (!value_col %in% names(data)) {
    stop(paste("Column", value_col, "not found in data"))
  }
  if (!is.numeric(data[[value_col]])) {
    stop(paste("Column", value_col, "must be numeric"))
  }

  # Filter positive values and remove NAs
  positive_values <- data[[value_col]][
    data[[value_col]] > 0 & !is.na(data[[value_col]])
  ]

  # Check if any values remain
  if (length(positive_values) == 0) {
    warning("No positive values found")
    return(list(mean = NA, sd = NA))
  }

  # Calculate statistics using built-in functions
  # (more accurate than manual calculation)
  list(
    mean = mean(positive_values),
    sd = sd(positive_values)
  )
}
Improvements:
- Clear, descriptive name
- Full documentation
- Input validation
- Column name parameter
-
NAhandling - Edge case handling
- Uses built-in statistical functions
- Named list output
What you might have noticed at this point: well documented and robust code often spends more lines on validation and documentation than on the actual logic itself.
That’s fine!!!
Writing maintainable code is more important than keeping it short.
From this code, you can also automatically generate documentation
pages using roxygen2, which is a great bonus for future
users (including yourself). Or you can use the documentation to generate
vignettes or tutorials.
Best Practices for AI-Assisted Code Review
1. Start with Specific Questions
Instead of: “Review this code”
Try: “Does this function handle missing data correctly?”
2. Review in Small Chunks
- Don’t send entire scripts for review
- Focus on one function or logical block at a time
- Easier to understand and act on feedback
3. Ask “Why” Questions
- “Why is this approach better?”
- “Why might this fail?”
- “Why is this more efficient?”
Understanding helps you learn, not just copy.
4. Combine Multiple Perspectives
- AI review
- Peer review
- Automated linting (e.g.
lintrpackage) - Testing (e.g.
testthatpackage)
5. Document Changes
Keep track of improvements.
R
# Version 1 (original): Simple but no error handling
# Version 2 (after AI review): Added input validation
# Version 3 (after testing): Improved edge case handling
But best not via comments, rather via a proper version control system such as Git. The latter is especially important when collaborating in teams and neatly integrated into RStudio.
In combination with GitHub, you can even use AI tools to help you write better commit messages, set up automated post-push actions for linting, testing, and documentation generation. And the GitHub Copilot can even help you via the GitHub web interface to review pull requests, suggest solutions for issues and improvements, as we will discuss in more detail in later chapters.
Group Discussion
Discuss with your peers:
- What types of code issues have you discovered using AI review?
- Have you encountered situations where AI gave incorrect advice?
- How do you balance AI suggestions with your own judgment?
- What are the limitations of AI code review compared to human review?
Limitations and Cautions
AI Cannot Replace
- Domain expertise: Understanding of your specific field
- Context awareness: Knowledge of project history and constraints
- Testing: Actual execution and validation
- Team standards: Specific conventions in your organization
Common AI Mistakes
- Suggesting overly complex solutions
- Not understanding project-specific constraints
- Proposing outdated or deprecated approaches
- Missing subtle domain-specific issues
When to Seek Human Review
- Security-critical code
- Complex algorithms
- Code with business logic
- Performance-critical sections
- Code you don’t fully understand
- AI chat interfaces provide valuable code review assistance
- Use iterative refinement: review, improve, and re-review
- Ask specific questions about correctness, performance, and style
- Always validate and test AI suggestions before accepting them
- Combine AI review with human peer review and automated tools
- Be aware of AI limitations and seek human expertise for critical code
- Document the review process and improvements made
Content from GitHub Issue-Driven Coding with Copilot
Last updated on 2026-01-16 | Edit this page
Estimated time: 40 minutes
Overview
Questions
- What is GitHub issue-driven coding with Copilot?
- How can I use GitHub issues to guide AI-assisted development?
- What are the best practices for working with Copilot on GitHub issues?
- How do I effectively communicate tasks to Copilot through issues?
Objectives
- Understand the concept of issue-driven development with AI assistance
- Learn how to structure GitHub issues for effective AI collaboration
- Master techniques for guiding Copilot through issue-based workflows
- Apply best practices for iterative development with issue tracking
- Recognize when to use issue-driven AI assistance vs. direct coding
Using AI autonomously
GitHub issue-driven coding combines the structured approach of issue tracking with the power of AI-assisted development. By linking your coding work to specific GitHub issues, you create a clear workflow that helps both human collaborators and AI assistants understand the context and goals of your code changes.
This approach is particularly valuable when working with GitHub Copilot, as it provides the AI with rich context about what you’re trying to accomplish, leading to more relevant and accurate suggestions.
Furthermore, you can “employ” the AI as additional team members, assigning them specific issues to work on in parallel with your own tasks. That way, you can leverage AI to accelerate development while focusing your efforts on reviewing the AI’s solutions and the more critical or complex parts of the project.
What is Issue-Driven Coding?
Issue-driven coding is a development practice where:
- Tasks are defined as issues: Each feature, bug fix, or improvement starts as a GitHub issue
- Issues provide context: The issue description explains the problem, requirements, and acceptance criteria
- Code references issues: Commits and pull requests link back to the issues they address
- Progress is tracked: Issue status reflects the current state of development
Why Combine Issues with AI Assistance?
When you work on code while referencing a GitHub issue, AI assistants like Copilot can:
- Better understand the task context
- Generate code that aligns with the stated requirements
- Suggest implementations that match the issue’s acceptance criteria
- Help maintain consistency across related changes
- Enable parallelizing progress on multiple subtasks when issues are well-defined
Use Cases for Issue-Driven AI Coding
1. Feature Implementation
Scenario: You need to add a new feature to analyze data trends.
GitHub Issue Example:
MARKDOWN
Title: Add trend analysis function to data processing module

Description:
Create a function that calculates linear trends in time series data.

Requirements:
- Accept a data frame with date and value columns
- Calculate slope and intercept using linear regression
- Return results as a named list
- Handle missing values appropriately
- Include error handling for invalid inputs

Acceptance Criteria:
- Function works with sample dataset
- Returns correct statistical values
- Handles edge cases (empty data, all NAs, single point)
Using Copilot: When you reference this issue while coding, Copilot understands you need a robust statistical function and will suggest implementations that include error handling and edge case management.
2. Bug Fixes
Scenario: Users report incorrect calculations in your analysis code.
GitHub Issue Example:
MARKDOWN
Title: Fix mean calculation ignoring NA values

Description:
The calculate_statistics() function returns NA when any value
in the input is NA, instead of computing the mean of available values.

Steps to Reproduce:
1. Call calculate_statistics(c(1, 2, NA, 4))
2. Expected: mean should be 2.33 (mean of 1, 2, 4)
3. Actual: function returns NA

Expected Behavior:
Function should use na.rm = TRUE by default or provide an option
to handle NA values.
Using Copilot: With this context, Copilot will
suggest fixes that specifically address NA handling, such as adding
na.rm = TRUE parameters.
3. Code Refactoring
Scenario: You need to improve code performance or readability.
GitHub Issue Example:
MARKDOWN
Title: Refactor data loading functions for better performance

Description:
Current data loading is slow with large files. Refactor to use
more efficient approaches.

Current Problems:
- Uses loops to process rows individually
- Reads entire file into memory at once
- No progress indication for large files

Proposed Improvements:
- Use vectorized operations where possible
- Implement chunked reading for large files
- Add optional progress bar
- Maintain backward compatibility
Using Copilot: The AI will suggest vectorized alternatives and modern R idioms that address the performance concerns.
4. Adding Tests
Scenario: You need to add test coverage for existing functions.
GitHub Issue Example:
MARKDOWN
Title: Add unit tests for data validation functions

Description:
Add comprehensive tests for validate_input() and sanitize_data()
functions.

Test Coverage Needed:
- Valid input handling
- Invalid input rejection
- Edge cases (empty data, single value, extreme values)
- Type checking
- NA and NULL handling

Framework: Use testthat
Target Coverage: 90%+
Using Copilot: The AI will generate appropriate test cases using the testthat framework that cover the specified scenarios.
Challenge 1: Create an Issue for AI-Assisted Development
Write a GitHub issue for adding a data visualization function to your R project. Include:
- Clear title
- Detailed description
- Specific requirements
- Acceptance criteria
Think about what information would help an AI assistant generate appropriate code.
MARKDOWN
Title: Create scatter plot function with trend line for correlation analysis

Description:
Implement a function to create scatter plots with optional trend lines
for exploring relationships between variables.

Requirements:
- Function name: plot_correlation()
- Parameters:
  - data: data frame
  - x_var: name of x-axis variable
  - y_var: name of y-axis variable
  - add_trend: logical, whether to add trend line (default: TRUE)
  - title: optional plot title
- Use ggplot2 for plotting
- Include correlation coefficient in plot subtitle when trend is shown
- Return a ggplot object for further customization

Acceptance Criteria:
- Creates clear, readable scatter plot
- Trend line uses appropriate statistical method (lm)
- Handles data with missing values
- Includes proper axis labels and title
- Works with sample mtcars dataset

Example Usage:
plot_correlation(mtcars, "wt", "mpg", title = "Weight vs MPG")
This issue provides clear context that helps Copilot suggest appropriate ggplot2 code with statistical elements.
How to Use GitHub Issues (with and without AI)
Create a Detailed Issue
Before starting to code, create a GitHub issue that clearly describes:
- The problem or feature: What needs to be done?
- Context: Why is this needed?
- Requirements: What are the specific technical requirements?
- Acceptance criteria: How will you know it’s done correctly?
- Examples: Input/output examples if applicable
Closing an Issue via Reference in Your Work
When referencing issues, include the issue number (with
#) in your code or git workflow using the keywords
“closes”, “fixes”, or “resolves”, GitHub will automatically link the
commit to the issue and close it.
In the following, some examples of referencing issues are provided:
In commit messages:
BASH
git commit -m "Add trend analysis function #42"
git commit -m "Fix NA handling in statistics - fixes #38"
In code comments:
R
# Implementation for GitHub issue #42: Add trend analysis
# See: https://github.com/username/repo/issues/42
analyze_trend <- function(data, date_col, value_col) {
  # Function implementation
}
In pull request descriptions:
Using Issues as AI Context for Autocompletion While Coding
When writing code that addresses an issue:
- Keep the issue open in your browser
- Reference requirements in code comments (maybe also the github repo’s URL)
- Write descriptive comments that mirror the issue’s language
- Test against acceptance criteria listed in the issue
Example workflow:
R
# GitHub Issue #42: Add trend analysis function
# Requirement: Accept data frame with date and value columns
# Requirement: Calculate slope and intercept using linear regression
# Requirement: Handle missing values appropriately

analyze_trend <- function(data, date_col = "date", value_col = "value") {
  # Input validation (Requirement: error handling for invalid inputs)
  if (!is.data.frame(data)) {
    stop("Input must be a data frame")
  }

  # Copilot will suggest implementations based on the comments
  # and your typing that align with the requirements
}
Triggering Autonomous AI Coding via Issues
When you create a detailed GitHub issue, you can “assign” it to GitHub Copilot (if supported in your environment) or simply reference it while coding.
This will trigger the following workflow:
- GitHub Copilot reads the issue description
- It creates a new git branch for the issue
- It generates code that addresses the issue requirements within the branch
- It creates a pull request for review and lists all changes made
- It will send you a notification to review the PR
- You will review the code, request changes if necessary, and merge it when satisfied
That way, the AI can work semi-autonomously on well-defined tasks, freeing you to focus on higher-level design and review.
This approach works very well for
- Specific feature implementations
- Bug fixes
- Error identification and handling
- Code refactoring
- Documentation generation or improvement/update
- Test case creation
- And more…
GitHub Repositories vs. RStudio Projects
While GitHub repositories and RStudio projects are related, they serve different purposes in the development workflow.
- GitHub Repository: A GitHub repository is a remote storage space on GitHub where your project’s files, including code, documentation, and version history, are hosted. It allows for collaboration, issue tracking, and version control using Git.
- RStudio Project: An RStudio project is a local environment within RStudio that organizes your work. It includes settings, file paths, and configurations specific to your R development. An RStudio project can be linked to a GitHub repository for version control and collaboration.
When working with issue-driven coding, you typically create and manage issues on the GitHub repository, while you do the actual coding and testing within your local RStudio project.
Thus, you have to ensure that your RStudio project is connected to the corresponding GitHub repository and you synchronize changes between them using Git commands.
GitHub Authentication in RStudio
In order to enable the communication between your local RStudio and the online GitHub server, you need to authenticate RStudio with your GitHub account. This can be done by generating a Personal Access Token (PAT) on GitHub and configuring RStudio to use it for authentication.
For detailed instructions on how to set this up, refer to the respective section in Happy Git and GitHub for the useR.
A general description about the integration of versioning systems like git in RStudio can be found in the RStudio User Guide.
Starting an RStudio project from a GitHub repository
Once your authentication is set up, you can clone a GitHub repository directly into RStudio to create a new project.
To this end
- Open RStudio
- Go to
File->New Project... - Select
Version Control - Choose
Git - Enter the repository URL from GitHub
- Note: ensure you use the “https://…” URL format if using PAT authentication!
- Select the local directory where you want to store the project
- Click
Create Project
Afterwards, RStudio will create a new project linked to the GitHub repository, allowing you to work on the code locally while managing issues and version control through GitHub.
Within the project you can use the Git tab in RStudio to commit changes, push updates to GitHub, and pull the latest changes from the repository.
Best Practices for git-based Projects
- always ensure that you pull the latest changes from GitHub before
starting new work to avoid merge conflicts.
- thus, do a “pull” whenever you open RStudio to work on the project
- commit changes frequently with clear messages that reference relevant issue numbers
- don’t forget to “push” your commits to GitHub to keep the remote repository updated
When using with GitHub issues, ensure that your commit messages and pull requests clearly reference the issues they address.
When using GitHub Copilot for issue-driven coding, always review the generated code carefully to ensure it meets the issue requirements before merging it into the main branch.
- ensure your remote repository is up-to-date before starting work on
an issue..
- check if you PUSHed all your local changes to GitHub
- assign the issue to GitHub Copilot (if supported)
- review and merge the respective pull request if satisfied
- PULL these changes into your local RStudio project to keep it synchronized !!!
- Issue-driven development provides structure and context for AI-assisted coding
- Detailed issues with clear requirements help AI assistants generate better code
- Reference issue numbers in commits, comments, and code to maintain traceability
- Use issues to guide Copilot for autonomous code generation and review
- Effective use of GitHub repositories and RStudio projects enhances collaboration and version control
- If not familiar with
git, read “Happy Git and GitHub for the useR” for a gentle introduction
Content from Wrap-Up and Next Steps
Last updated on 2026-01-02 | Edit this page
Estimated time: 20 minutes
Overview
Questions
- What are the key best practices for AI-supported coding?
- What additional AI applications exist beyond what we covered?
- How can I stay current with rapidly evolving AI tools?
Objectives
- Summarize key takeaways and best practices from the workshop
- Identify additional AI applications for programming tasks
- Understand the importance of staying current with AI developments
- Recognize the ongoing evolution of AI capabilities and tools
Congratulations!
You’ve completed this journey through AI-supported coding with GitHub Copilot in RStudio!
Throughout this workshop, you’ve gained hands-on experience with various AI tools and techniques that can significantly enhance your programming productivity and capabilities.
Let’s consolidate the most important lessons into actionable best practices and look ahead to the exciting future of AI-assisted development.
Key Takeaways and Best Practices
Throughout this workshop, you’ve explored essential practices for AI-supported coding. Here are the most important lessons to remember:
Start with Proper Setup
Best Practice: Invest time in proper configuration from the beginning.
- Ensure GitHub Copilot is correctly installed and authenticated in RStudio
- Disable indexing of project files to maintain privacy and improve performance
- Test your setup with simple examples before tackling complex projects
Use AI Where It Excels, Avoid Where It Doesn’t
Best Practice: Be strategic about when to use AI assistance.
- Use AI for: Boilerplate code, documentation, learning new libraries, repetitive patterns
- Avoid AI for: Critical algorithms, novel implementations, security-sensitive code, learning fundamentals
- Always apply human judgment .. AI is a tool, not a replacement for expertise
Always Verify and Take Responsibility
Best Practice: Never blindly accept AI suggestions.
- You are fully responsible for all code you commit, regardless of its source
- Test AI-generated code thoroughly, especially for edge cases and error handling
- Review for security vulnerabilities, performance issues, and correctness
- Maintain your programming skills, don’t become overly dependent on AI!
Write Clear Prompts for Better Results
Best Practice: Guide AI with descriptive comments and context.
- Use clear, specific comments to describe what you need
- Provide context about data structures, requirements, and constraints
- Request error handling, documentation, and edge case coverage explicitly
- Iterate on prompts if initial suggestions aren’t quite right
Provide Context for Accurate Suggestions
Best Practice: Help AI understand your project conventions.
- Use
AGENTS.mdfiles to define project-specific guidelines and patterns - Structure your code clearly so AI can better understand your codebase
- Keep related code visible in your editor to provide context
- Define naming conventions and coding standards
Integrate AI into Your Workflow
Best Practice: Use AI systematically, not sporadically.
- Incorporate AI into data pipelines using tools like
ellmerfor consistent results- BUT: document the used model etc. to stay (as far as possible) reproducable!
- Use AI to refactor and modernize legacy code systematically
- Leverage AI for comprehensive documentation generation
- Apply AI assistance to test generation and validation
Structure Work with Issues
Best Practice: Use issue-driven development to guide AI effectively.
- Create detailed GitHub issues with clear requirements and acceptance criteria
- Reference issues in your code to provide context for AI suggestions
- Use AI as a collaborative team member on well-defined tasks by assigning it in the issue
- Track progress and maintain traceability through issue links
Beyond This Workshop: Further AI Applications
The AI tools and techniques we’ve covered are just the beginning. The field is expanding rapidly, and new applications emerge constantly:
Additional AI-Powered Development Tools
Code Review and Quality Assurance:
- AI-powered code review tools that identify bugs, security issues, and style violations
- Automated test generation based on code analysis
- Intelligent code coverage tools that suggest missing test cases
- Static analysis enhanced with machine learning
Documentation and Communication:
- Automatic generation of API documentation from code
- AI-assisted technical writing and blog posts about your code
- Automated creation of user guides and tutorials
- Translation of documentation across multiple languages
Project Management and Planning:
- AI tools for estimating development time and complexity
- Automated task breakdown from high-level requirements
- Intelligent prioritization of issues and features
- Predictive analytics for project timelines and risks
AI for Data Science and Analysis
Advanced Analytics:
- AI-assisted feature engineering for machine learning models
- Automated exploratory data analysis and visualization suggestions
- Intelligent data cleaning and preprocessing recommendations
- Natural language querying of datasets
Statistical Modeling:
- AI suggestions for appropriate statistical tests and models
- Automated model selection and hyperparameter tuning
- Interpretation assistance for complex statistical results
- Validation and diagnostics guidance
Emerging AI Capabilities
Multimodal AI Tools:
- Tools that understand both code and diagrams
- AI that can work with screenshots and visual interfaces
- Voice-activated coding assistants
- AI that integrates code with database schemas and architecture diagrams
Specialized Domain AI:
- Domain-specific AI trained on bioinformatics, finance, or other specialized fields
- AI assistants with deep knowledge of specific R packages and ecosystems
- Industry-specific coding assistants (e.g., for healthcare, finance, research)
Collaborative AI:
- AI tools that learn from your team’s coding patterns
- Shared AI knowledge bases across development teams
- AI facilitators for code reviews and pair programming
- Integration with team communication platforms
The Rapidly Evolving AI Landscape
AI capabilities are evolving at an unprecedented pace.
The tools and techniques you’ve learned here are just the beginning! New models, features, and applications emerge constantly.
What this means for you:
- Tools will become more capable, i.e. stay informed about updates to Copilot and RStudio’s AI features
- Best practices will evolve, i.e. engage with developer communities to learn from shared experiences
- New paradigms will emerge, i.e. remain flexible and open to new approaches
- Continuous learning is essential, i.e. the field moves fast, and staying current requires active effort
Looking to the Future
The integration of AI into programming is not a temporary trend—it represents a fundamental shift in how we develop software and data processing pipelines.
Embrace the Change
Rather than fearing AI or becoming overly dependent on it, strive for a balanced approach:
- Use AI as a powerful tool that amplifies your capabilities
- Maintain your core skills so you remain effective with or without AI
- Stay curious and adaptable as new capabilities emerge
- Think critically about AI suggestions rather than accepting them blindly
- Share knowledge to help build a community of responsible AI users
The Human Element Remains Essential
While AI capabilities continue to grow, remember that:
- Creativity and innovation come from human insight
- Domain expertise cannot be fully replaced by AI
- Ethical judgment requires human values and context
- Quality standards must be set and enforced by people
- Learning and growth remain uniquely human pursuits
AI is a tool that makes you more effective—but you remain the developer, the decision-maker, and the expert.
Final Thoughts
Thank you for joining us on this exploration of AI-supported coding in RStudio!
The best practices you’ve learned provide a solid foundation for working effectively with AI tools. As you continue your journey, remember to:
- Be strategic in choosing when to use AI assistance
- Be critical in evaluating AI suggestions and outputs
- Be responsible for all code you commit
- Be adaptable as AI capabilities continue to evolve
- Be engaged with the community to share and learn
The future of programming is being written right now, and you’re part of it. Use these best practices to make AI a powerful ally in your development work while maintaining your expertise and judgment.
Keep Learning and Practicing!
Remember: AI is here to assist you, not replace you. Your judgment, expertise, and creativity are irreplaceable. Apply the best practices you’ve learned to use AI tools effectively while continuing to develop your skills and knowledge.
The best is yet to come!
- Always verify AI suggestions—you are responsible for all code you commit
- Use AI strategically: excel at boilerplate and documentation, avoid critical algorithms
- Write clear prompts and provide context for better AI suggestions
- Structure work with GitHub issues to guide AI effectively
- AI applications extend beyond code completion to testing, documentation, and project management
- The AI landscape evolves rapidly—stay current through communities and experimentation
- Human expertise, judgment, and creativity remain essential
- Balance AI assistance with skill maintenance to avoid over-dependence
- Treat AI as a powerful tool that amplifies your capabilities, not a replacement