Problems, Safety, and Best Practise
Last updated on 2026-03-13 | Edit this page
Estimated time: 60 minutes
Overview
Questions
- What common problems will I encounter when using git?
- How do I undo mistakes safely?
- How should I organise my repository and collaborate with others?
Objectives
- Handle common git pitfalls (empty directories, wrong commits)
- Undo changes using revert, discard, and reset (beginner-safe)
- Explain the difference between public and private repositories
- Describe protected branches, collaborators, and permissions
- Use GitHub issues effectively
Common Problems
In the following, we will discuss some common issues that beginners encounter when using git and GitHub, along with practical solutions.
Empty Directories
Git tracks files, not directories. If you create an empty folder, git will ignore it.
Workarounds:
Thus, if you really want to keep an empty directory in your repository, e.g. to indicate where data files should go, you can:
- Create a “hidden” placeholder file called
.gitkeepinside the directory.- Can be empty
- The name
.gitkeepis a convention (not a special git feature) to indicate that the file exists solely to keep the directory in version control. - Ensure to add and commit the
.gitkeepfile so that the directory is tracked.
- Make sure every directory contains at least one meaningful
file.
- For example, you could add a
README.mdinside the directory with instructions or descriptions. - This is often a better practice than using
.gitkeep, as it provides context for collaborators.
- For example, you could add a
Undoing Changes
It happens again and again that you make a change to a file and then realise that you made a mistake, or that you changed the wrong file. Or you accidentally commit a file that should not be tracked (e.g. a large data file or credentials).
In that case, you want to undo your work and restore the file to the last committed state that is clean or safe.
There are several ways to undo work in git. Here is a beginner-friendly compact overview to be discussed subsequently.
| Situation | Action in GitHub Desktop | What happens |
|---|---|---|
| Changed a file but have not committed | In “Changes” right-click the file → Discard changes | File returns to the last committed state |
| Committed but have not pushed | Right-click the commit → Undo Commit | The commit is removed from the local repository, changes are kept in the working directory |
| Already pushed | Use Revert Commit and push again | A new “revert”” commit is added that undoes the commit’s changes. |
Undo Uncommitted Changes
If you have changed a file wrongly but not used git so far, things are easy. You can simply either undo the changes (with any tool) or use the Discard changes option in the Changes view in GitHub Desktop. This will restore the file to the last committed state from your local repository, discarding all changes since then.
We are crossing fingers that you have not made any important changes to the file since the last commit, because they will be lost.
Undo Committed but Local Changes
If you committed a file or changes by mistake (for example a large data file or credentials or just nonsense changes), but have not yet pushed to GitHub, you can undo the commit and keep the changes in your working directory. This allows you to fix the mistake and then commit again.
- Don’t panic. The commit is only local until you push.
- In GitHub Desktop, right-click the commit in History and choose Undo
commit.
- This removes the commit but keeps the changes in your working directory, allowing you to fix the mistake.
- Add the file (pattern) to
.gitignoreso it is not tracked in the future.
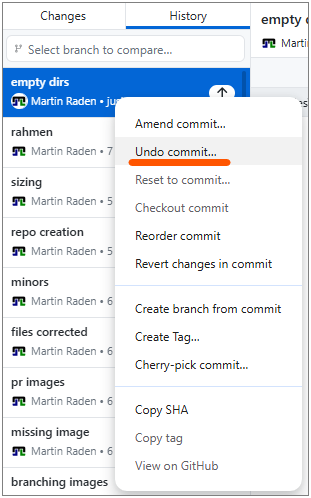
Note: This is only possible for commits that are not yet pushed to the remote repository (GitHub). Such “local” commits are indicated with a small “UP”-arrow icon in GitHub Desktop.
Credentials and secrets
Never commit passwords, API keys, or other secrets. If you accidentally push a secret to GitHub, consider it compromised — rotate/change the credential immediately and remove it from the repository history.
Undo Already Pushed Changes
If you have already pushed a commit to the remote repository
(e.g. GitHub) and want to undo it, you should not try to remove it from
history (e.g. with git reset --hard or
git rebase) because that can cause problems for
collaborators who have already pulled the commit. Instead you should
push a new commit that reverts the changes of the
previous commit. This way, the history remains intact and collaborators
can see that a change was made and then undone.
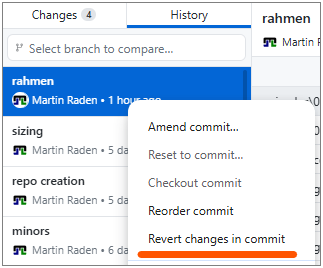
- In GitHub Desktop, right-click the respective commit in History view
- Choose Revert changes in commit.
- This creates a new commit that undoes the changes introduced by the original commit.
- Push the new revert commit to GitHub.
In case you need to undo multiple commits, you can revert them one by one starting from the most recent one. This way, you avoid merge conflicts that can arise when reverting multiple commits at once.
A note on rebase
You may encounter the term rebase in online tutorials. Rebasing rewrites commit history and is an advanced technique. Do not use rebase on shared branches unless you fully understand the implications — it can cause serious problems for collaborators. Stick with merge for now.
Repository Visibility
| Setting | Who can see the repo | Who can contribute |
|---|---|---|
| Public | Anyone on the internet | Only collaborators (unless forked) |
| Private | Only you and invited collaborators | Only collaborators |
Choose private for sensitive or unfinished work. Choose public when you want to share your project with the world.
The visibility setting is configured when you create a repository, but you can also change it later in the General repository settings on GitHub.
Protected Branches
Teams often protect the main branch so
that:
- No one can push directly to
main. - All changes must go through a pull request.
- Pull requests require at least one approving review before merging.
This prevents accidental breakage on the stable branch. Furthermore, it encourages code review and discussion before changes are integrated.
Reviewing can be bypassed by administrators for simple changes, but it’s good practice to follow the process even if you have admin rights.
Branch protection can be set up in the repository settings on GitHub (see below).
If you encounter an error when trying to push to main,
it’s likely that the branch is protected and you need to create a new
branch and open a pull request instead.
- Go to your repository on GitHub.
- Click Settings → Branches.
- Under “Branch protection rules”, click Add branch ruleset.
- Enter
mainas the branch name pattern. - Check Require a pull request before merging and other options as needed.
Collaborators and Permissions
To give someone access to your private repository (or push access to a public one):
- Go to Settings → Collaborators.
- Click Add people and search for their GitHub username.
- Choose a permission level (Read, Write, or Admin).
That way, they can clone the repository, push changes, and collaborate with you. Furthermore, you have full control over who can access your private repositories and what they can do.
GitHub Issues
Issues are used to track tasks, report bugs, and discuss ideas.
Good practices are:
- Clear title: summarise the problem or request in a few words.
- Description: explain the context, steps to reproduce (for bugs), and expected behaviour. You can also add screenshots or code snippets if relevant. It is also possible to reference lines of code or specific commits.
-
Labels: use labels like
bug,enhancement,questionto categorise. -
Linking: reference issues in commit messages or PRs
using
#123syntax.
Each issue gets a unique number (e.g. #1) and can be assigned to milestones, projects, or specific people. The latter is especially useful in team projects to indicate who is responsible for addressing the issue.
This number can be used to link the issue to commits and pull
requests, which helps to keep track of what work is being done to
resolve the issue. Thus, if your commit is solving a specific issue, you
can write Closes #1 in the commit message or PR
description, and GitHub will automatically close the issue when the
commit is merged. Furthermore, respective information about the linked
issue will be visible in the PR, which helps reviewers to understand the
context of the changes.
Documentation and README files
As already hinted at above, README.md README files are a
great way to provide documentation for your project. They are written in
Markdown and rendered as HTML on GitHub. Eventually, you may want to
create a README file within each directory to explain its purpose and
contents. This is especially helpful for collaborators who are new to
the project and may not be familiar with the structure. A
well-structured README can serve as a guide for navigating the
repository and understanding the overall project. It can also include
instructions and guidelines for respective directories, which can be
very helpful for onboarding new contributors and ensuring that everyone
is on the same page regarding the project’s structure and
organization.
Generally, a README.md file should
- Provide an overview of the project/directory and its purpose.
- Explain how to use the project or its components.
- Include any necessary setup instructions or dependencies.
- Be kept up to date as the project evolves.
The central README file in the root directory can also
- include links to other README files in subdirectories, creating a clear and navigable documentation structure for the entire project.
- provide documentation for dependencies, data sources, or other external resources that are relevant to the project.
- serve as a central hub for all project-related information, making it easier for collaborators to find what they need and understand the project’s structure and goals.
Typically, the project’s central README.md also serves
as the landing page when exporting the repository to GitHub Pages, so it
is a good place to provide an introduction and overview of the project
for visitors. This process will be discussed in more detail in the next
episode on publishing and automation.
General Recommendations
When working project-centered supported by git, it is good to keep some general ideas in mind.
Git from the Start
Start using git from the very beginning of your project, even if you are working alone. This way, you can track your changes, revert to previous versions if needed, and have a clear history of your work. It also makes it easier to collaborate with others later on, as you will already be familiar with the workflow and have a well-organised repository. The latter brings us the next point.
Organise Your Repository
Organise your repository in a clear and logical way from the start.
Use directories to separate different components of your project
(e.g. src for source code, data for datasets,
docs for documentation). This makes it easier to navigate
and understand the structure of your project, especially for
collaborators who may be new to it. Furthermore, it helps to keep your
work organised and manageable as the project grows in size and
complexity.
Here some ideas what to put under git-version control:
- image sources (e.g. InkScape or Gimp files, scripts for generating figures, …)
-
raw data files (e.g. CSV, Excel, …), best compressed as
.zipor.tar.gzto avoid large diffs - code (e.g. Python scripts, R scripts, Jupyter notebooks, …)
-
documentation (e.g.
README.md,docs/, …) - manuscript (e.g. LaTeX files, Word documents, …)
Things you should not put under git-version control (using
.gitignore):
- large data files (e.g. raw video, audio, large datasets, …) — use a data repository or storage service instead and link to it from your README
-
credentials (e.g. API keys, passwords, …) — use environment
variables or a secrets manager instead and add them to
.gitignoreso they are not tracked - build outputs (e.g. compiled code, generated figures, …) — these can be generated from the source files and do not need to be tracked
- temporary files (e.g. logs, caches, …) — these are not part of the project and can be ignored
Documentation
Most important is to keep your documentation up to date. Whenever you add a new directory, file, or component to your project, consider adding a README file to explain its purpose and contents. Update the central README file to reflect the overall structure and any new dependencies or instructions. This way, you ensure that your project remains understandable and navigable for yourself and others, even as it evolves over time.
Markdown and README.md files are really a fast an
efficient way to provide documentation for your project.
Synchronise Often
Make it a habit to commit and push your changes regularly. This way, you have a clear history of your work and can easily revert to previous versions if needed. It also makes it easier to collaborate with others, as they can see your changes and provide feedback in a timely manner. Regular commits also help to break down your work into manageable chunks, making it easier to track your progress and identify any issues that may arise.
Use Issues for Task Management
Use GitHub Issues to track tasks, bugs, and feature requests. Whenever something comes up that you need to address, create an issue with a clear title and description. This way, you can keep track of what needs to be done and prioritise your work effectively. Issues also facilitate collaboration, as others can comment on them, offer help, or take ownership of specific tasks.
Never Duplicate Again
Most important, never duplicate work again, as done in the comic in one of the last episodes. Once files are under (git) version control, never create “.._v1”, “.._final”, or “.._final_final” copies of files again. This is a common mistake that leads to confusion and a messy repository. Instead, use git to track changes and maintain a clear history of your work. If you need to experiment with changes, create a new branch and work there, then merge back when you are ready. This way, you can keep your repository clean and organised, and avoid the pitfalls of manual file duplication.
Exercise: Your Troubleshooting Checklist
Create a short checklist titled “What to do when something went wrong”. Include at least five items covering the scenarios discussed above.
- Unwanted changes to a file? → Discard changes in GitHub Desktop.
- Wrong commit (not yet pushed)? → Undo the commit in GitHub Desktop.
- Wrong commit (already pushed)? → Revert and push the revert commit.
- Committed a secret? → Rotate the credential immediately. Remove from history if possible.
-
Empty directory not showing up? → Add a
README.mdor.gitkeepfile. - Merge conflict? → Open the file, resolve the markers, commit, and push.
- Cannot push to main? → The branch is probably protected. Create a branch and open a pull request instead.
- Git does not track empty directories — use
.gitkeepas a placeholder. - Use Discard changes for uncommitted edits and Revert for commits.
- Never commit secrets; rotate any that are accidentally pushed.
- Protected branches enforce a pull request workflow.
- Issues help organise work; use clear titles, descriptions, and labels.
- README files provide essential documentation and should be kept up to date.